- Products
- >
- Panels
- >
- SHX Touch Panel
Safety warning
- It highly recommended to read the entire manual before start using this device.
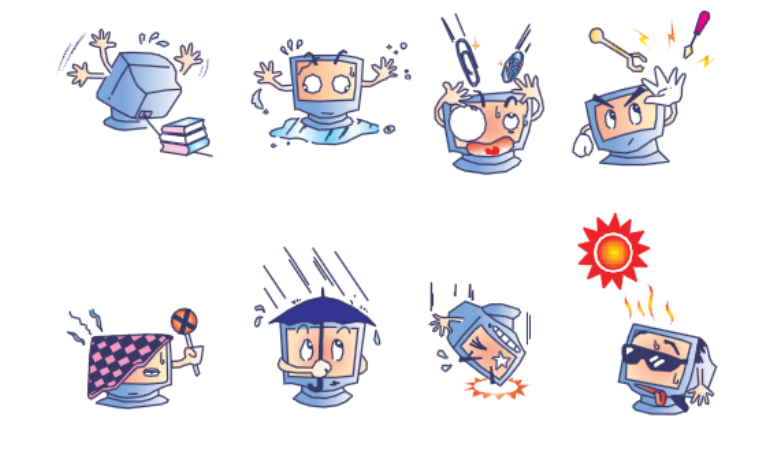
- The product should be always used under adult supervision.
- Never use abrasive products on the fabric (ammonia, acetone, bleach, etc).
- In case the furniture is in contact with liquids, dry the surfaces immediately to avoid wetting the foam. The seams are not waterproof
- Install the cables in a way that they can not be pulled or crushed.
- Do not cover the ventilation grilles to ventilate the heat generated in the unit can dissipate easily.
- The device can not be used outdoors or in humid environments.
- Do not handle the device with wet hands.
- Disconnect the device from the electrical power in case:
1. appreciate any damage to the product or cables.
2. due to a hit the product has suffered some damage.
3. is not working properly.In this casethe panel must be repaired.
Technical specifications
- Screen size: 42 “diagonal”
- Aspect ratio: 16: 9
- Screen resolution: 1,920 × 1080 @ 60Hz
- Viewing angle: horizontal ± 89º to 178º / vertical ± 89º to 178º
- Brightness: 500 nits
- Contrast: 4000: 1
- Speakers: 4 × 5W stereo
- Power: 240Vac at 50 / 60Hz
- Dimensions: 1007 mm × 596 mm × 60 mm (without soft protection and wall mount).
- Weight: 20.78 Kg
- Optimal working temperature: 0º to 35º
Fabrics:
- Cable length: 15 meters
- Cable connector: Speakon Male
- Antimicrobial protection
- Antibacterial protection
- Antifungal protection
- Abrasion high resistance
- Resistance to perspiration and human saliva,
- Resistance to urine,
- Resistance to blood,
- Total weight: 620 gr / m2
- Thickness: from 0.5 mm to 1 mm
- Meets REACH regulations
- Flame retardant material classification m2
- It complies with the EN71-3 toy safety standard
- Measures: 40 × 40
Foams:
Technical qualities of the foams we use in our products: both polyurethane and polyethylene foams are standardized foams and comply with the most demanding European regulatory standards, both technically and environmentally.
Description
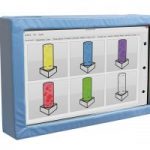
This large touch panel allows you to control BJ Control SHX software to activate any scene and cells, which also can be activated by the other controllers in the room. Additionally it is possible to add any other sensory software to increase its possibilities.
The touch panel is compatible with the SHX system.
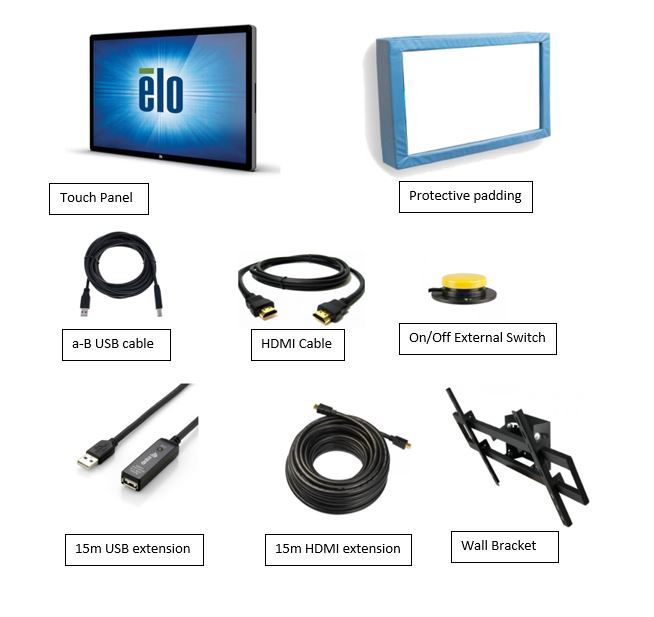
Components
Pre-Installation
For the installation of the SHX Panel the following parts are required:
- HDMI cable from the computer (included in the product)
- USB cable from the computer (included in the product)
- 230V power socket available
Installation
1. Electric connection
To assemble the panel, open the back cover.
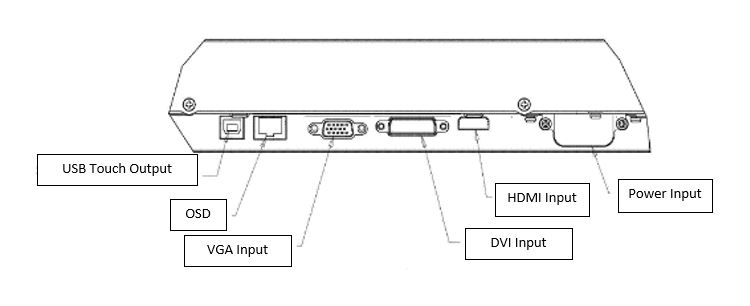
The following connections must be made:
- Connect the power cable to the connection “Power input AC”
- Connect the HDMI cable to the “HDMI Input” connector. The other end must be connected to the computer. If necessary, use the supplied HDMI cable extension.
- Connect the USB cable to the “USB Touch Output” connector. The other end must be connected to an available USB port on the computer. If necessary, use the supplied USB extension cable.
- In the adapted OSD control, connect the ignition button supplied with the product:
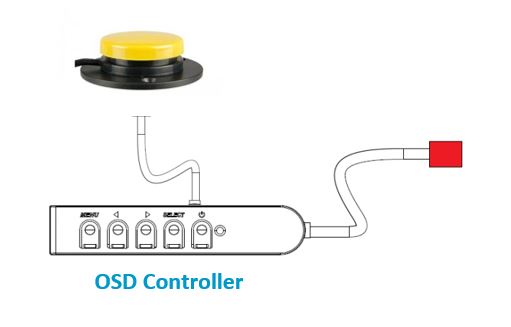
IMPORTANT: It’s recommended to check the manual of the attached monitor to know its operation and configuration.
2. Wall bracket
Materials needed for assembly:
For the assembly of this device the following items are needed (not included in the product):
- 4 or 8 dowels (minimum 8mm) (make sure you use the appropriate dowels on the mounting surface)
- 4/8 screws.
Assembly:
STEP 1: Fix the fixing base of the support on the wall:
In order to perform a correct instalation of the unit check the following points:
- Make sure the wall where the monitor is going to be installed can support up to 4 times the total weight of the equipment.
- It is always the responsibility of the installer to ensure the fixation of the fixing plate, making sure is sufficiently resistant to the weight of the monitor.


STEP 2: Fix the panel on the fixing base of the wall bracket.
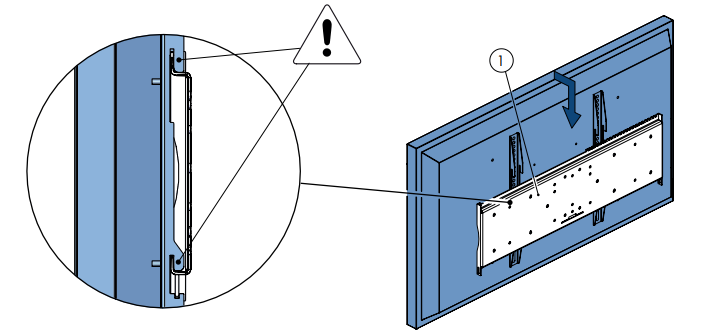
STEP 3: Put the blocking bar.

STEP 4: Placing the padding
Place the padding on the monitor frame by removing the protections of the double-sided tape. Once the frame is placed, fix the activation button in an accessible and comfortable place to turn on the monitor.
Startup
For the use of the panel the following steps must be followed:
- Turn on the panel with the attached push button.
- Turn on the computer where the panel is connected.
- As soon as the computer has booted, the image will appear in the panel.
- You can turn off the panel by pressing the power button.
If you have purchased the product without a SHX Rack or SHX Compact, for proper operation of the device, you must install the installation files (drivers) of the Panel on the computer. Follow the instructions in “The touch screen does not work properly” in the Troubleshooting section of this manual.
Maintenance
Cleaning the protection padding:
- Wash with water and mild soap
- Rinse with clean water.
- Dry with soft cloth.
Maintenance of the panel
- Unplug the AC power cord before cleaning.
- To clean the screen, use a cloth lightly moistened with a mild detergent.
- It is important that your unit remains dry. Do not allow any liquids to enter in the unit. If liquid enters, contact a qualified service technician before switching it on again.
- Do not wipe the screen with a cloth or sponge that may scratch the surface.
When cleaning the touch screen, use a window or glass cleaner applied on a clean cloth or sponge. Never apply the cleaner directly on the touch screen. Do not use alcohol (methyl, ethyl or isopropyl).
Troubleshooting
The SHX Touch Panel doesn’t turn on:
- Check if the AC power cord is connected correctly.
- Check if the AC power supply works.
- Check if the plug where the Panel is connected has power.
Panel brightness is dimmed:
Use the OSD menu to increase the brightness and contrast. (Refer to the Panel user manual).
Why does the monitor display the message “Out Of Range”?
Adjust the resolution and frequency mode of the computer to be within the specified allowable frequency ranges: Horizontal synchronization frequency (31.5 – 73 KHz), Vertical synchronization frequency (47 – 63 Hz)
The touchpad doesn’t work.
Check if the USB cable is connected in both ends.
“No signal” message appears on the screen.
Check if the HDMI cable is connected to the computer and the screen.
With the OSD control, through the configuration menu, check if the signal input setting corresponds to the port where the HDMI cable is connected
The touch screen doesn’t work correctly:
In case the touch function does not work properly, you must download the installation files of the touch panel.
Download the files from the ELO page:
https://www.elotouch.com/support/downloads#/On the web page, select the correct driver according to the device model and operating system on your computer.
Install the downloaded files following the instructions of the setup program.Once installed, run the ELO configuration program and perform a calibration of the screen.
Warranty
Within the legal warranty period we agree to rectify for free by repairing or replacing defects in the product derived from defective materials or manufacturing defects.
Any unauthorised alteration or modifications to the product will void this warranty.
Product conformity
This product complies with the requirements indicated in the European Directive 2004/108 / EC.
Customer service
If you find any damage or any material is missing please contact our technical service for assistance.
Qinera
c/ Pacífic 51
08027 Barcelona, Spain
Phone: +34 93 285 04 37
Fax: +34 93 553 56 34
e-Mail: info@qinera.com
web: http://www.qinera.com
Any damage or breakage caused during transport must be notified within three days of receipt.


