- Products
- >
- Controllers
- >
- Button 6 v.1
Safety warning
- To ensure the safe operation of the device it is recommended to read this user manual completely before starting to use it.
- Do not expose the control to high temperatures.
- In case of failure, do not manipulate the controller.
- For cleaning, switch off the main switch.
- Do not charge the device if the cable or power connector is damaged.
- Use the device under adult supervision.
- Do not use the device if the cable is damaged.
- Avoid that liquids may fall on the device.
- Use the device under adult supervision.
Medical devices
- Radio equipment can interfere with the functioning of medical devices that are not suitably protected. Consult a physician or the manufacturer of the medical device to determine whether it is adequately shielded from external radio frequency energy.
Implanted medical devices
- Manufacturers of medical devices recommend a minimum separation of 15.3 centimetres (6 inches) between a wireless device and an implanted medical device such as a pacemaker or implanted cardioverter defibrillator, to avoid potential interference with the medical device. Persons who have such devices should:
- Always keep the wireless device more than 15.3 centimetres (6 inches) from the medical device.
- Not carry the wireless device in a breast pocket.
- Move the wireless device away if there is any reason to suspect that interference is taking place.
- Follow the manufacturer directions for the implanted medical device.
- If you have any questions about using the wireless device with an implanted medical device, consult your doctor.
Operating environment
- Other products that use the same frequency band (433 MHz) as this remote control can interfere with the control of the receivers. Make sure that neither the remote nor the receivers are located near these sources.
Potentially explosive environments
- Do not use the device in any area with a potentially explosive atmosphere. Follow the instructions.
Technical Specifications
- 7 V, 2000 mAh lithium-ion polymer battery
- Charging jack
- RF working frequency: 433 MHz (ISM)
- Dimensions: 290 x 220 x 120 mm
- USB charger: 5V – 1A
- Charge time: 5h
Description
Introduction
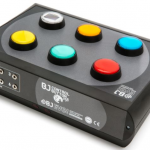
This versatile control allows you to interact in a simple way with the elements of a multi-sensory room.
It allows you to control the color and activation one or several Luminea devices individually or combined and also as an SHX System controller.
Parts of the device
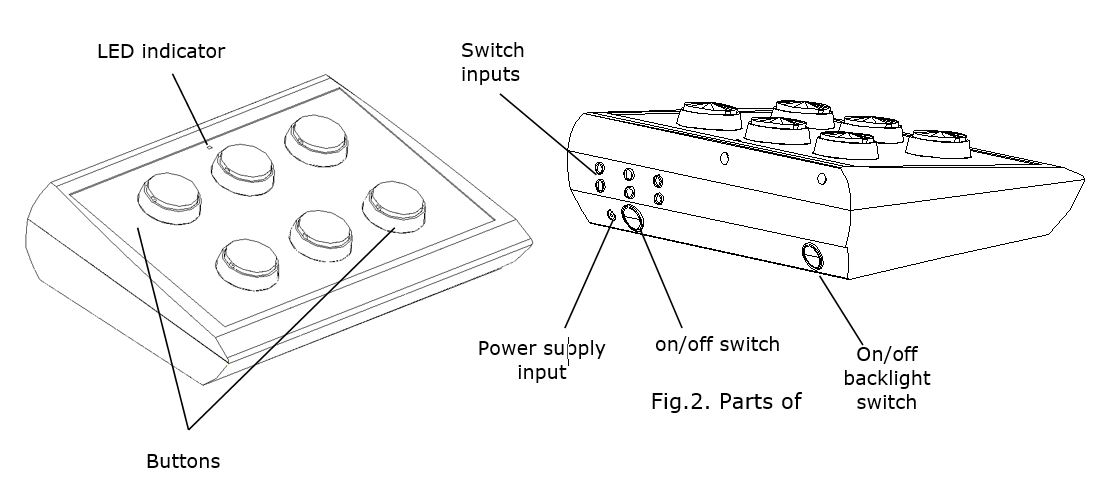
This remote has:
- An ergonomic keypad with 6 backlighted buttons,
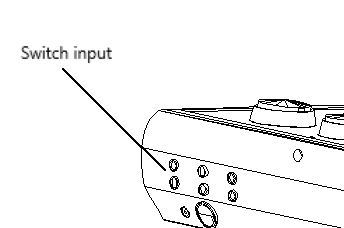
- 6 switch inputs for connecting external switches, an infrared port,
- LED status indicator,
- On/off switch
- On/off backlight switch
- Input for battery charging.
- Configuration button (on the bottom side)
It is powered by a battery that can be recharged by connecting it directly to the USB port of a computer or to the mains using the charger supplied with the remote control.
Changing the covers of the buttons
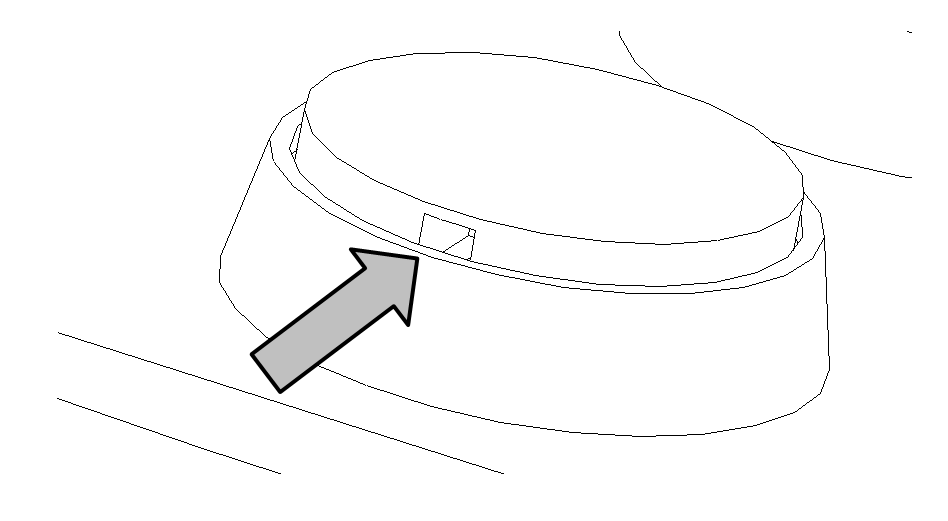
It is possible to change the covers and the labels of the buttons. This allows choosing among different covers (transparent or colour ones) and change the icons to label the buttons if desired.
Remove the covers by introducing any thin object in the covers’ slot and pull towards the buttons outside.
Startup
- Make sure the battery of the Controller is charged
- Turn on the Controller by turning the main switch to position “I”
- If you want to activate the button’s LEDs, you have to put the LED switch (on the left side of the controller) to “I”
Configuration
Button 6 can be configured in five different modes:
1. Tube Control
2. Fiber Control
3. Control of any other Luminea device
4. Control of all Luminea devices at once
5. SHX control
How to change control mode:
1. Press and hold the settings button on the bottom end of the controller.
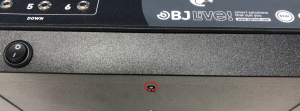
2. Follow the steps shown below and press the button for the desired control mode.
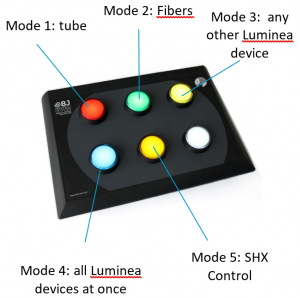
3. Release both buttons.
4. The LED indicator will flash the same number of times as the number of the selected mode.
How to use
Direct control of Luminea devices:
When you have selected the relevant control mode, you will be able to change the colour of the Luminea device using the controller buttons.
The white button activates the Auto function:
– If the device is switched off, it will switch it on and activate the automatic colour transition mode.
– If the device is already switched on, it will turn it off.
The remote uses radio frequency signals so there is no need to aim.
SHX mode
The SHX Controller allows you launch the 6 first buttons programmed in a scene of the SHX program. Each button of the controller corresponds to a button of the selected activity in the SHX program.
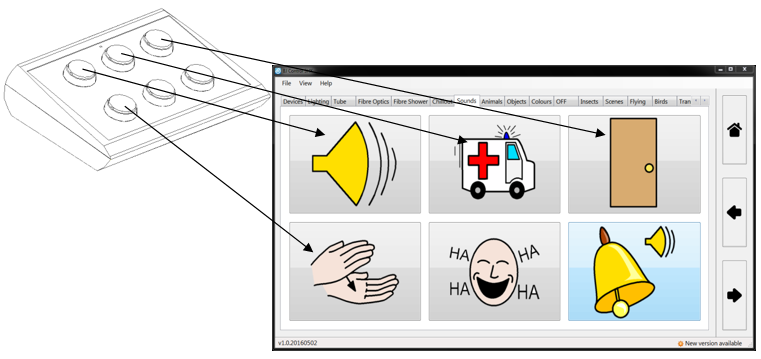
Fig. 1: Correspondence between the buttons of the device and the buttons in the SHX program
When the activity changes, the buttons will change and the controller will launch the different contents of each button accordingly.
- Select any scene in the SHX program.
- Press the button corresponding to the contents that you would like to launch.
Use of the switch inputs:
If you want to use a special button to activate the remote, you can use the switch inputs on the back of the remote.
- Connect the switch to the corresponding input and activate the switch. The effect is the same as if the control button were pressed.
Maintenance
For the maintenance and cleaning of the equipment, take the following precautions:
- Do not connect the equipment to other types of connections than USB ports.
- To connect and disconnect the cable always hold it by its connector. Do not stretch directly from the cable even when the cable outlet is bent or in a forced position.
- For cleaning the device, use a cloth slightly dampened in water.
- Do not use abrasive substances. Always clean with the device disconnected.
- Do not allow liquids to enter the inside of the box for the switch inputs and they can seriously damage the equipment.
- This equipment is not designed for outdoor use.
- In case of failure do not manipulate the device.
Proper care and use of the device
- Keep the device dry. Moisture and liquids may damage the parts or electronic circuits of the device. Water damage to your device may void the warranty.
- Do not use or store the device in dusty or dirty areas. Dust may cause the device to malfunction.
- Do not leave the device on a sloping surface if it is not properly secured. Do not drop the product or subject it to impacts. It may be damaged if dropped.
- Do not store the device in hot or cold areas. Use it at temperatures between 0°C and 50°C. The device could explode if left inside a closed vehicle as the internal temperature could reach 80°C.
- Do not expose the device to direct sunlight for long periods (e.g. on the dashboard of a car).
- Avoid letting the device come into contact with metal products that could scratch the surface. Avoid storing the device in your pockets as it could be damaged if it is bent or deformed, or parts may stop functioning correctly.
- Do not store the device near magnetic fields.
- Do not store the device in or near heaters, microwaves, hot cooking equipment or high-pressure containers, because the battery may leak and the device could overheat and cause a fire.
- Press the keys gently and do not use sharp objects that could damage the surface of the keypad.
- Do not disassemble, modify or repair the device. Any changes or modifications made to your device could void the warranty.
- Do not paint your device or attach stickers to it.
- When cleaning the device:
- Use a towel or soft cloth to clean the device and charger.
- Do not use chemicals, detergents or solvents.
- Do not use it for any purpose other than that for which it was designed.
- The device is not a toy. Do not allow children to play with it because they could hurt themselves and others or damage the device.
- Only allow qualified professionals to service your device.
Battery charge and care
The battery needs charging when the LED on the remote flashes red.
IMPORTANT: Before charging the battery check that the on/off switch is ON (position 1)
To charge the remote, follow these steps:
- Connect the charger cable to any computer USB port or to the charger supplied with the product.
- During charging, the LED will turn red. The LED will turn green when the battery is charged.
- When the charging cable is disconnected, the LED switches itself off and the remote returns to standby mode, ready for use.
IMPORTANT: Switch off the remote if it is not in used. This will extend the battery life.
- The battery installed in the remote is a single lithium ion polymer cell.
- It is VERY IMPORTANT NOT to let the battery fully discharge. It should be recharged immediately when the battery LED indicates that the battery is discharged. Allowing the battery to fully discharge could cause irreversible damage to it.
- Ion polymer batteries cannot withstand temperature excesses. For this reason:
- Do not leave the remote near heat sources such as radiators, electric blankets, heaters, etc.
- Never leave the remote inside vehicles.
If it overheats, the battery could catch fire.
- Only charge the battery with the charger supplied with the product or through a USB port. The charging process must be witnessed in order to detect any charging abnormalities.
- Use the battery and charger for their intended purposes only. Improper use or use of unapproved batteries or chargers may present a risk of fire, explosion, or other hazard, and may invalidate any approval or warranty.
- The battery can be charged and discharged countless times but it will eventually wear out. You will need to replace the battery when the battery life is noticeably shorter than normal. To do this, contact BJ Adaptaciones to replace it.
- The full charging time of the battery can vary between 3 and 4 hours.
- Lithium-ion polymer batteries can be charged before they are fully discharged because they are not susceptible to the memory effect. We do not recommend charging the battery before it has lost 5% of its charge. This will cut down on unnecessary charging that can be harmful due to the increase in temperature. Charging and discharging quickly and often will increase the inaccuracy between the battery charge status and power meter readings.
- Leaving the battery at a high level of charge in a high-temperature environment for extended periods (> 60°C) also accelerates the loss of capacity.
- Frequent full charges and discharges put stress on the battery and drastically reduce its lifespan.
- Try to keep it between 15°C and 25°C (59°F and 77°F). Extreme temperatures reduce the capacity and lifetime of the battery. A device with a hot or cold battery may not work temporarily.
- When the battery is fully charged, disconnect it from the charger, as overcharging may shorten the battery’s lifetime.
- This equipment is not designed to run on an external power supply.
- The correct way to disconnect the device from an external power supply is, firstly, to unplug the cable from the socket transmitting the electricity to the power supply/equipment charger. You may then remove the connector socket directing the voltage to the actual equipment.
- You should do this the other way round when connecting to the power supply.
- When you unplug a charger or an accessory, hold and pull the plug, not the cord.
- When your charger is not in use, unplug it from the electrical plug and the device.
- Do not use the charger outdoors.
- If you consider the battery or charger are damaged, contact BJLive! to have it inspected before continuing to use it. Never use a damaged charger or battery
Troubleshooting
If the system doesn’t respond, follow the next guide.
To make sure the issue is not related to the current scene, test it in different scenes:
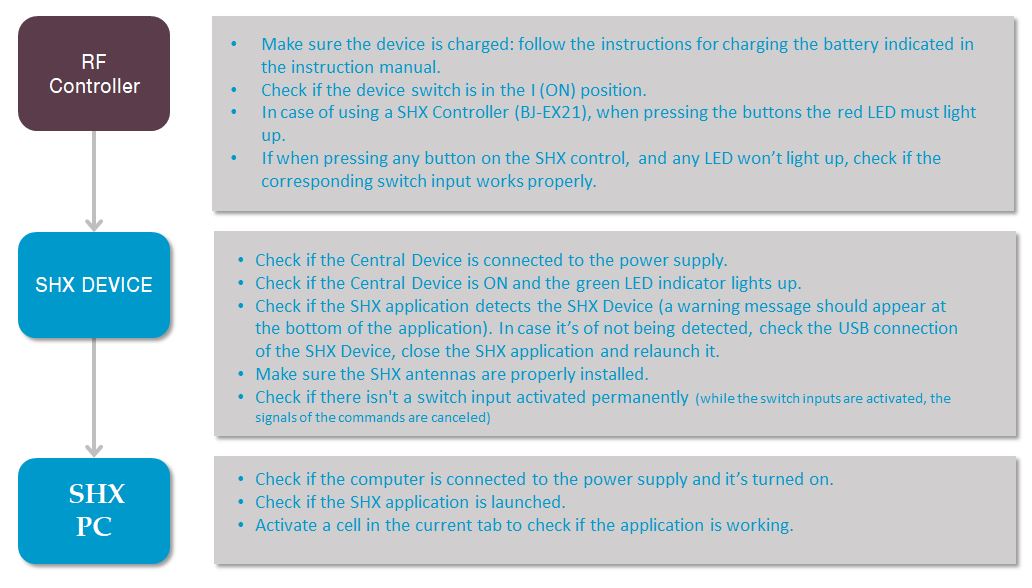
The buttons that are being activated with the SHX Controller or the SHX Dice do not correspond to the scene on the tablet:
Check the following settings on the tablet:

Recycling
Correct disposal of this product
- At the end of their life, this product and its electronic accessories (e.g. charger or USB cable) should not be disposed of with other household waste.
- To prevent possible harm to the environment or human health from uncontrolled waste disposal, please separate these items from other types of waste and recycle them responsibly to promote the sustainable reuse of material resources
- Household users should contact either the retailer where they purchased this product, or their local government office, for details of where and how they can take these items for environmentally safe recycling.
Correct disposal of batteries in this product
- The batteries should not be disposed of with other household waste. Where marked, the chemical symbols Hg, Cd or Pb indicate that the battery contains mercury, cadmium or lead above the reference levels in EC Directive 2006/66. If batteries are not properly disposed of, these substances can cause harm to human health or the environment.
- To protect natural resources and to promote material reuse, please separate batteries from other types of waste and recycle them through your local, free battery return system.
- Do not dispose of batteries in a fire as they may explode. Dispose of batteries according to local regulations. Recycle when possible. Do not dispose as household waste.
- Do not dismantle, cut, open, crush, bend, puncture, or shred cells or batteries. If a battery leaks, do not let battery liquid touch skin or eyes. If this happens, immediately flush the affected areas with water, or seek medical help.
Warranty
Within the legal warranty period we agree to rectify for free by repairing or replacing defects in the product derived from defective materials or manufacturing defects.
Any unauthorised alteration or modifications to the product will void this warranty.
Product conformity
This product complies with 2014/30/EU Directive requirements .
Declaration of conformity can be downloaded by clicking on the following link: bjliveat.com
Customer service
If you find any damage or any material is missing please contact our technical service for assistance.
Qinera
c/ Pacífic 51
08027 Barcelona, Spain
Phone: +34 93 285 04 37
Fax: +34 93 553 56 34
e-Mail: info@qinera.com
web: http://www.qinera.com


