
Introduction
The Control 4 remote control allows you controlling several devices in your environment in a simple way. Once programmed, you can activate each function by directly pressing the keys on the remote.
What devices can be controlled with this remote?
a) All Enabler receivers. These allow you to control common elements around the home, such as lights, blinds, alarms, doors, beds, etc.
b) All devices around the home operated by remote controls, including stereos, televisions, DVD players, etc.
ADDITIONAL INFORMATION:
What is the BJ system?
The BJ system is a system that allows you to control your home wirelessly. There are two elements to the BJ system: the remote controls and the receivers.
BJ system controls can be used to control different types of receivers, including those for alarms, plug sockets, bed control, blinds, etc.
They can also control any equipment in your home that is already operated by a remote control via infrared.
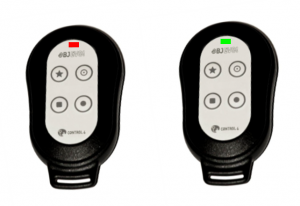
What are the parts of the remote control?
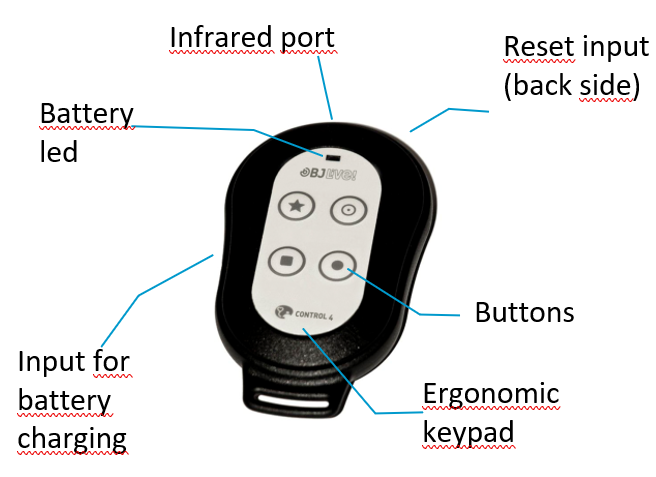
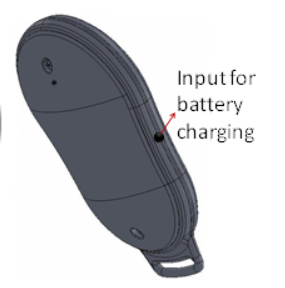
This remote has an ergonomic keypad with four buttons, an infrared port, LED status indicator, reset input and input for battery charging. It is powered by a battery that can be recharged by connecting it directly to the USB port of a computer using the charger supplied with the remote control.
Two functions can be associated to each button, with the exception of the scene change button. So, with this remote, you can programme up to 6 different functions in total (7 in “Shift change scene mode”). If you do not want to use both scenes, you can programme functions on the four buttons of the remote.
Basic operation
To get the most out of your remote, you need to programme each key (button) with the desired functions. For example, you could set off an alarm or turn up the volume on the television by pressing ⋆, depending on which function you recorded.
Follow these steps to enable a device:
- Check that the battery is charged. The battery needs charging when the LED on the remote flashes red.
- Follow the instructions of this manual to programme the key on the remote that you want to use (e.g. key ⋆).
- Prepare the device that you wish to control according to its instructions.
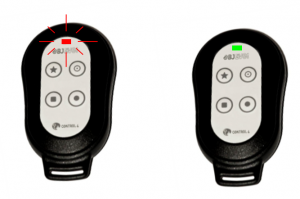
- Enable the programmed key (e.g. key ⋆) directly by pressing it. When you press down on it, if you are in scene 1, the LED will turn red, whereas, if you are in scene 2, the LED will turn green. The programmed action will then be performed. To enable a function that is programmed in scene 2 on the same key, press the change of scene key and then the ⋆ key.

The remote uses radio frequency signals to control Enabler receivers, so you can activate the receiver without the need for a direct line of sight between the remote and the receiver.
Infrared signals are used to control devices operated by remote controls that have been copied to the sequential direct remote control. In this case, then, there must be a direct line of sight between the remote control and the receiver, just as there would with the original remote control.
Programming
How a device is programmed depends on the type of equipment you wish to control, i.e. whether it is an Enabler receiver or a device that works with infrared (devices that already have a remote control, like televisions, DVD players, stereos, etc.).
Programming for Enabler receivers
To control Enabler receivers, you must assign the RF code identifying the receiver to the key on the remote that will be used to operate with this receiver.
ADDITIONAL INFORMATION:
What is an RF code?
For a remote to control the various receivers you have installed, each receiver must be identified by a code that differentiates it from the others. Hence, each receiver has an “RF code selector” that allows you to assign a code to it. By programming this code in the Control remote, you can control each of the receivers you have installed. See the user manual of the receiver you wish to control to find out its RF code.
Once you have the information on the code to programme, follow these steps:
- Choose the key you wish to programme.
- Select the programming mode on the remote.
- Enter the code to programme.
- Record in the desired scene.
IMPORTANT: The RF code programmed into the remote must always be a three-digit number, so if the code indicated for the receiver only has two digits, add a 0 in front. For example, if you have a receiver for a socket with the code 37, programme the remote with the code 037.
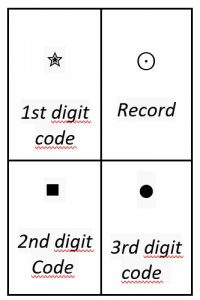
It is a good idea to use the programming template when programming as it indicates the numbers and functions associated with each key.
In the following example, we will programme the ⋆ key in scene 1 to control an alarm receiver with an “RF code” of 25. The programming steps are as follows:
- Choose the key you wish to programme.In this step, you need to choose which key on the remote you want to assign receiver control to. In the example here, this is the key.
All keys can be programmed with two functions except for the one used to change scenes (this can be the ▲ key or any other key that has been programmed to change the scene).
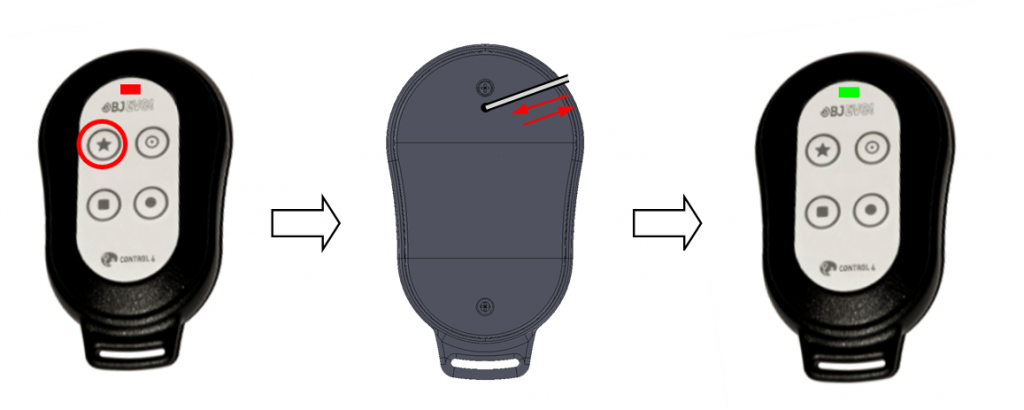
- Select the programming mode on the remote.In this step, press and hold the key you wish to programme. The status LED will turn red.
Without releasing the button, use something pointed to press and release the reset button (on the back of the remote).
The LED will turn green, indicating that the remote is ready for a function to be programmed in the selected key.
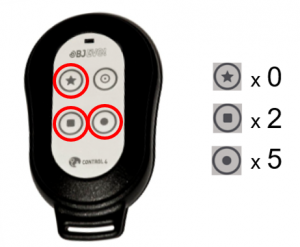
- Enter the code to programme.In this step, the digits of the receiver code are entered one by one.
In the example given (code 025), these would be entered as follows:
1) Press the ⋆ button 0 times
2) Press the ■button 2 times
3) Press the ● button 5 times
- Record in the desired scene.After entering the code digits of the receiver, press the Record (⊙) button to save the code in scene 1.
Alternatively, press and hold the Record button until the grenn led turns on, to save the code in scene 2.
After completing this action, the remote goes into standby mode.
IMPORTANT: If the remote freezes while programming or you wish to cancel it, you can exit programming by pressing the Reset input.
NOTE: Code 255 cancels all functions assigned to a key.
Programming for infrared functions (standard receivers)
Prepare the remote you want to duplicate. Make sure that there are no other infrared devices switched on in the room (some laptops, mobile telephones and other devices could interfere with the recording process).
When duplicating a remote control for a device, you need to remember that each key on the remote can only be programmed with a single function of the remote control of the device. For example, if you wish to control the volume of a stereo system, you need to record the “volume up” function on one key and the “volume down” function on another.
To programme an infrared function, follow steps 1 and 2 of the previous section for RF code recording, and then:
- Prepare the remote to record the infrared signal. In this step, enter the code 000. To do this, press the Record button to record at Scene 1 or press and hold Record button until the red led turns on, to record on Scene 2, depending on which scene the function you wish to record is in. The LED will turn red, indicating that the remote is ready to record the infrared signal in the selected key.
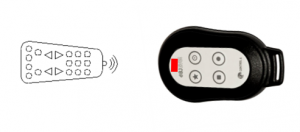
- Record the infrared signal
1) Point the remote control that you wish to duplicate at the “infrared recording” port of the sequential direct remote control and press the button on the remote that you wish to duplicate.
2) When the control has stored the function of the other remote, the LED will switch itself off, indicating that programming has ended.
Programming of special codes:
Code 400: This code is used to record infrared signals instead of code 000 when we want the device to perform the programmed action for as long as the key is pressed.
For example, if the action recorded is “turn up the volume on the television,” if code 000 was used, when you press the button where the signal was recorded, the volume on the television will be turned up one level. However, if you used code 400, the remote continues the action, so the volume will continue to rise until you release the button.
Code 500: This code is used for the dual recording of the infrared signal. This is a useful feature because the infrared signal emitted by some consumer devices can change even when the same button is pressed (e.g. the same button switches the television “on” and “off”). With this code, you can record the different signals emitted by the device to resolve situations where the recorded action would otherwise only work half of the time.
To begin, record the first press of the button on the remote control you wish to copy using code 000 and then record the second time it is pressed using code 500.
NOTE: Check that they were recorded correctly; if not, repeat the process until they are recorded correctly. If after five attempts you have not managed it, contact your dealer as it may be possible that the two remotes are incompatible.
Code 800: This code is used to perform the action recorded in a key in scene 2 in the next press of a key. The battery LED flashes green to indicate the change of scene. After the second keystroke, the remote automatically returns to scene 1.
Battery use, care and safety
The battery needs charging when the LED on the remote flashes red. To charge the remote, follow these steps:
- Connect the charger cable to any computer USB port or to the charger supplied with the product.

- During charging, the LED will turn red. The LED will turn green when the battery is charged. When the charging cable is disconnected, the LED switches itself off and the remote returns to standby mode, ready for use.
Charging Charged
- The battery installed in the remote is a single lithium ion polymer cell.
- It is VERY IMPORTANT NOT to let the battery fully discharge. It should be recharged immediately when the battery LED indicates that the battery is discharged. Allowing the battery to fully discharge could cause irreversible damage to it.
- Ion polymer batteries cannot withstand temperature excesses. For this reason:
- Do not leave the remote near heat sources such as radiators, electric blankets, heaters, etc.
- Never leave the remote inside vehicles.
- If it overheats, the battery could catch fire.
- Only charge the battery with the charger supplied with the product or through a USB port. The charging process must be witnessed in order to detect any charging abnormalities.
- Use the battery and charger for their intended purposes only. Improper use or use of unapproved batteries or chargers may present a risk of fire, explosion, or other hazard, and may invalidate any approval or warranty.
- The battery can be charged and discharged countless times but it will eventually wear out. You will need to replace the battery when the battery life is noticeably shorter than normal. To do this, contact BJ Adaptaciones to replace it.
- The full charging time of the battery can vary between 3 and 4 hours.
- Lithium-ion polymer batteries can be charged before they are fully discharged because they are not susceptible to the memory effect. We do not recommend charging the battery before it has lost 5% of its charge. This will cut down on unnecessary charging that can be harmful due to the increase in temperature. Charging and discharging quickly and often will increase the inaccuracy between the battery charge status and power meter readings.
- Leaving the battery at a high level of charge in a high-temperature environment for extended periods (> 60°C) also accelerates the loss of capacity.
- Frequent full charges and discharges put stress on the battery and drastically reduce its lifespan.
- Try to keep it between 15°C and 25°C (59°F and 77°F). Extreme temperatures reduce the capacity and lifetime of the battery. A device with a hot or cold battery may not work temporarily.
- When the battery is fully charged, disconnect it from the charger, as overcharging may shorten the battery’s lifetime.
- This equipment is not designed to run on an external power supply.
- The correct way to disconnect the device from an external power supply is, firstly, to unplug the cable from the socket transmitting the electricity to the power supply/equipment charger. You may then remove the connector socket directing the voltage to the actual equipment.
- You should do this the other way round when connecting to the power supply.
- When you unplug a charger or an accessory, hold and pull the plug, not the cord.
- When your charger is not in use, unplug it from the electrical plug and the device.
- Do not use the charger outdoors.
- If you believe the battery or charger is damaged, contact BJ Adaptaciones to have it inspected before continuing to use it. Never use a damaged charger or battery.