- Products
- >
- SHX System
- >
- SHX Rack
Safety warning
- To ensure the safe operation of the device it is recommended to read this user manual completely before starting to use it.
- Assembly the unit on a stable surface, capable of supporting the weight of the rack.
- Keep ventilation openings free.
Please read the manual completely to ensure proper use of the device. - A correct and supervised use of this equipment will guarantee a good performance during its lifetime.
- The device should not be used outdoors or in humid environments.
- Do not disconnect the device from the wall plug with wet hands.
- Never leave users without adult supervision while using this product.
- In case you notice the cables or the device itself are damaged, disconnect it from the power supply and do not use the device. Contact our technical service to repair the unit.
Technical specifications
Technical specifications:
- External dimensions: 540x430x560 mm
- Power: 230V – 50Hz
SHX Device:
- Power: 5Vdc / 1A
- USB 2.0 type C
Radiofrequency:
- Frequency: 433 MHz
- Scope: 30 m
Infrared:
- Frequency: 38kHz
Vibration amplifier:
- 2 + 2 vibration outputs
- Maximum power 50W x channel
- Minimum impedance: 4 ohm
Sound amplifier:
- 2 channels for speakers
- Maximum power: 80W x channel
- Minimum impedance: 4 ohm
PC features:
- i5 6400 Quad core @ 2.70 GHz
- Intel® Chipset H110 Express Chipset
- DDR4 DIMM 32 GB
- DDR4 2400/2133 MHz
- Video output D-Sub, DVI-D and HDMI
- Audio Realtek® ALC887 codec high definition audio channel 2/4 / 5.1 / 7.1
- LAN Realtek® GbE LAN chip (10/100/1000 Mbit)
- Hard disk: SSD 240 Gb
- Second hard disk: HDD SEAGATE 1TB (backup purposes)
- Wifi WL-PCI ASUS PCE-AC51 AC750
- Windows 10 pro 64 bits
Description
What does this equipment allow you to do?
This device includes a PC, allows the control of multisensory rooms based on the SHX system.
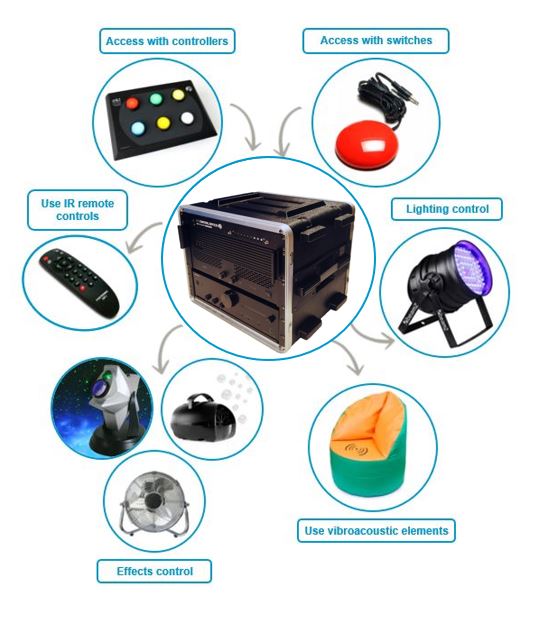
SHX Rack components
The model or brand of some of the parts described in this section may differ from the equipment you have received, but the main features and operation remain the same.
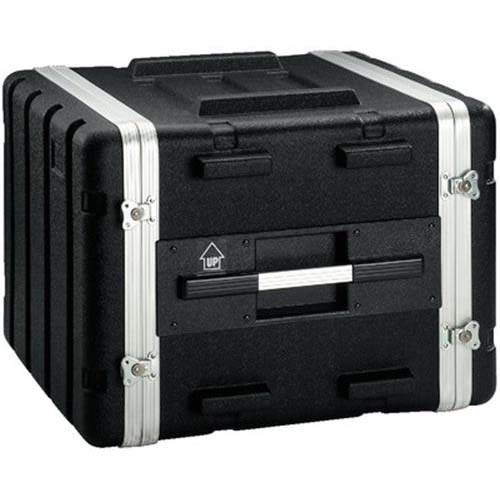 External dimensions: 540x430x560 mm
Rack PC
The PC comes with the SHX application installed and the entire set of demonstration contents. Other programs included are: TeamViewer for remote support and the SHX app installed on the tablet.
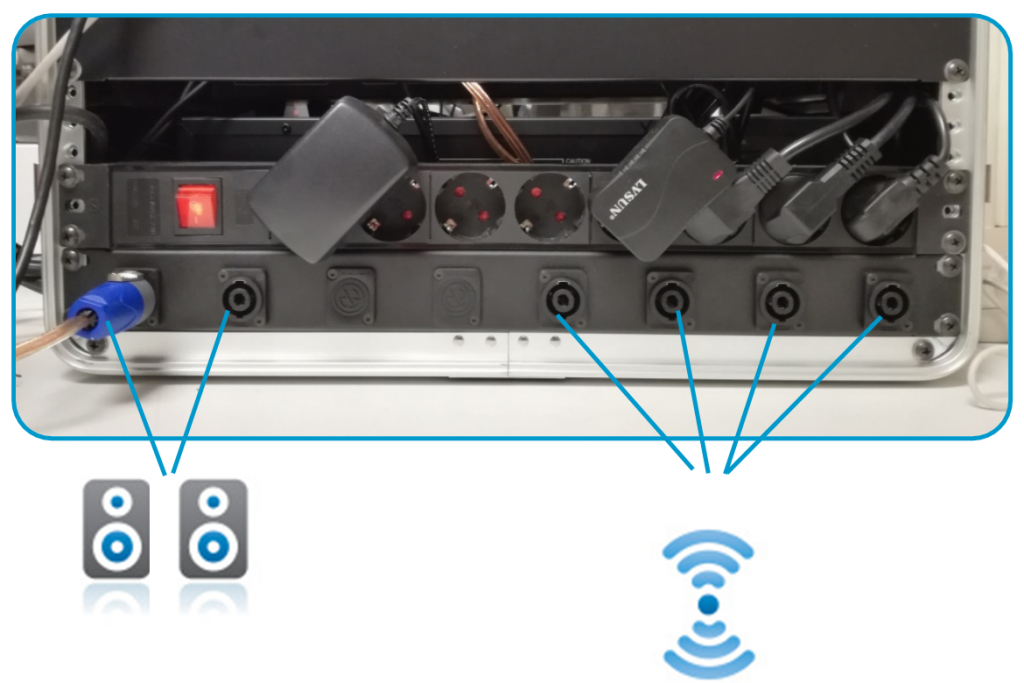
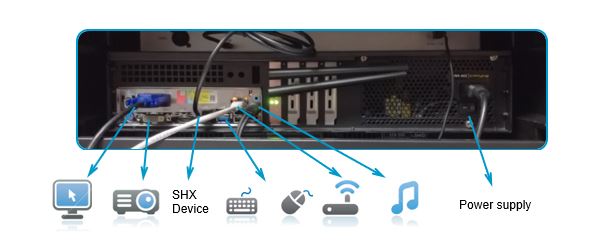 Rear connections
Amplifiers
AC amplifier for vibroacoustic system:
Power stage that feeds up to 2 + 2 vibroacoustic elements.
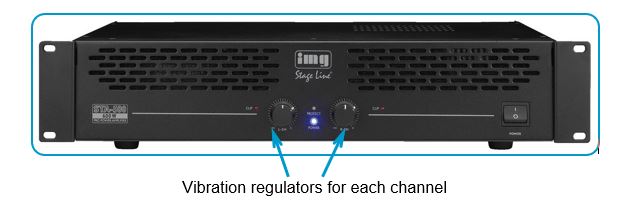
Hi-Fi amplifier for sound system:
Audio amplifier used for the sound of the room, feeds two acoustic screens

SHX rack rear connection sound and vibroacoustic system.
The vibration amplifier of SHX Device allows the connected elements to vibrate to the rhythm of the music, allowing users to feel the music in the body.
.
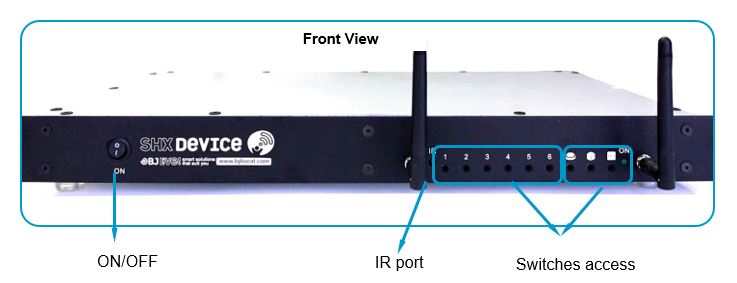
SHX Device
The SHX device integrates the control of all the elements in a multisensory room: elements controlled by DMX, RF and IR, UV, projection, etc.

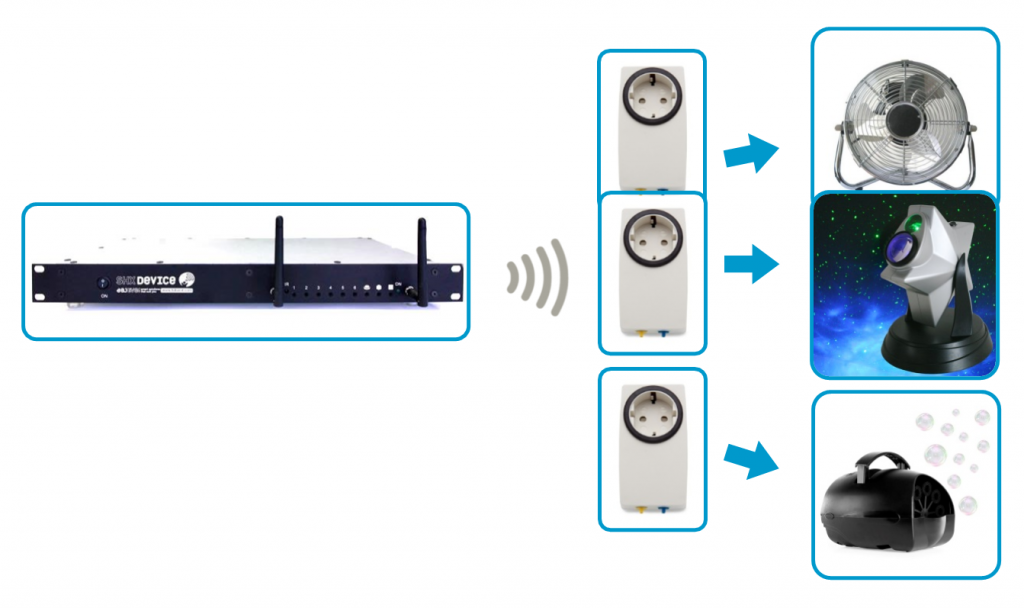
- Electrical devices (special effects such as: star projector, bubble machine, fan …) connected to an Enabler Socket + via radiofrequency signals.
- Devices controlled by infrared (TV, projector …)
- DMX lighting devices
It’s to access to control it through sweep mode, touch screen, eye control and in general with any means that allows access to computers and tablets. It can be controlled remotely as well using external switches and any of our EC remote controls.
This computer has a Windows interface, SHX desktop application. This program allows you to create a wide number of scenes, controlling all the elements of the room, adapting the stimuli to the needs of the users and creating fascinating and immersive multisensory environments.
Equipment Parts

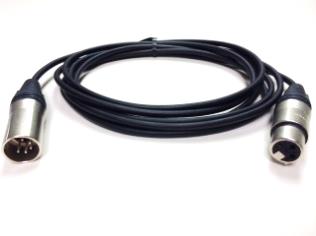
- DMX cable 5 pin male – 3 pin female
- End line connector
Accessories included
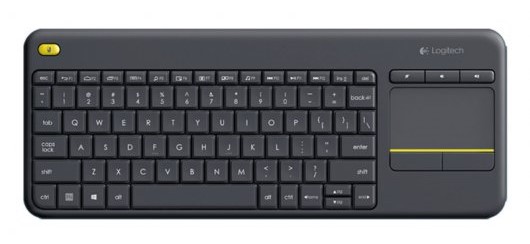
Keyboard and mouse:
A keyboard with wireless touchpad is included
SHX Tablet
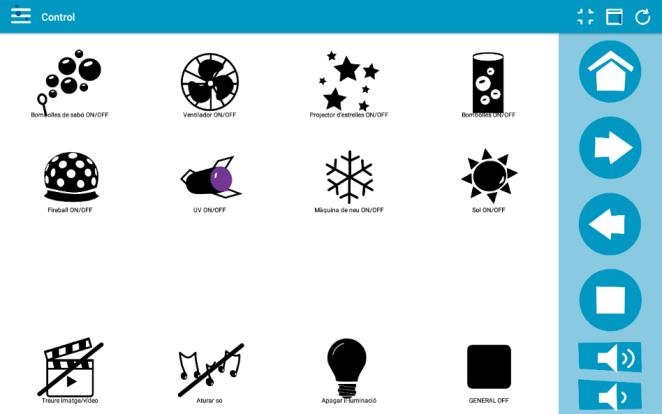
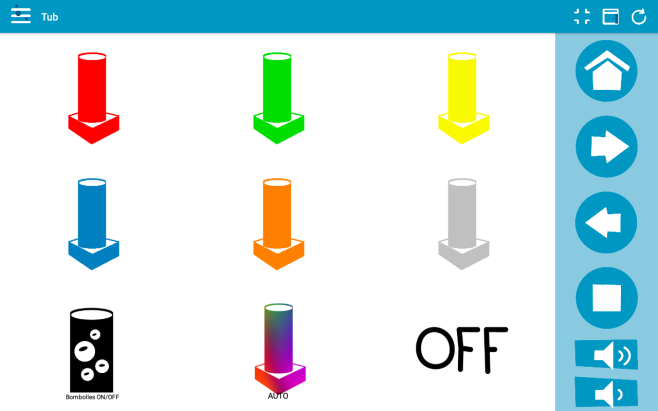
An Android tablet is included with the SHX app installed. The tablet delivered is ready to use.
A sleeve is also included.
Projection System
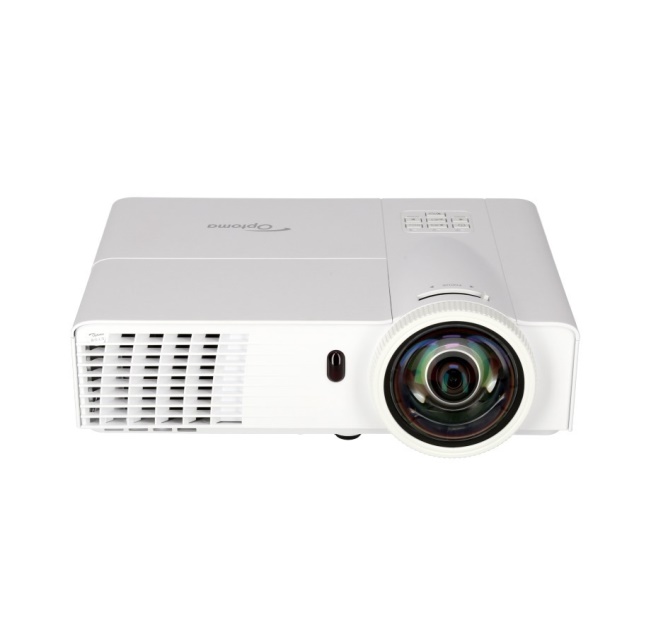 Epson EB530
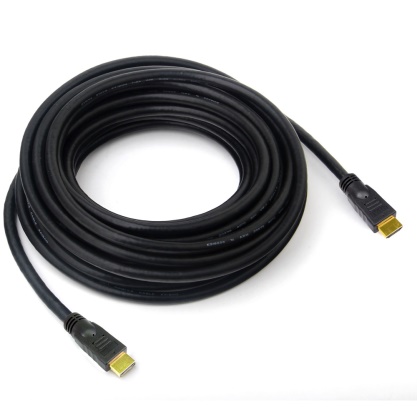 HDMI 15m

The projector stand suitable for the ceiling of the room is shown. The assembly instructions are included in the stand packaging.
Speakers

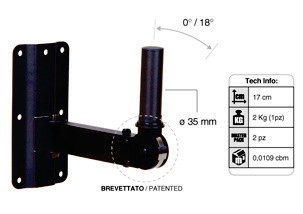
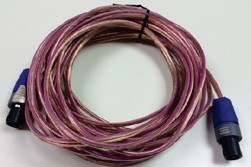
Router
The equipment includes a Router for the connection of the Tablet with the PC.
Check the router’s user manual to see the connection settings of the Tablet.
Important: the use of the router must be reserved only for the exclusive use of the Tablet.
Pre-Installation
To assemble the device, the following elements must be sent to the installation point:
Connections for the computer:
5 power plugs 230V – 50Hz. Total Pmax: 2300W
HDMI cable to projector (15m)
USB extension for USB devices to connect: Proximity, SHX Carpet, e.g.
Connections for SHX Device
DMX cable to the first lighting element. (12m)
Connections for the vibration amplifier:
The cables for all vibroacoustic elements are not included in the Rack. Each product has it’s own cable. (15m)
Connections for the sound amplifier:
2 speaker cables. (15m each)
Installation
- Connect the different elements of the room to the SHX rack as indicated.
- Connect the speaker cables to the rear connectors of the rack indicated as AUDIO. To connect the connectors, insert the connector and turn it until you notice a “click”.
- Connect the vibration elements to the vibration connectors on the rear. To connect the connectors, insert the connector and turn it until you notice a “click”.
- Connect the DMX cable to the Central Device connector.
- Connect the HDMI cable of the projector to the corresponding port of the computer.
- Connect the wireless keyboard receiver to a USB port on the computer.
- Connect the USB cables from the USB devices in the room to the computer.
- Plug the rack’s power cord to a wall plug. Make sure that the rack terminal has the switch set to the ON position.
Assembly of the speakers:
Materials needed for fixing the speakers:
- 6 wall screws for 6mm stud
- 6x 6mm studs (min). (Make sure you use the appropriate plugs on the mounting surface.
Assembly:
To fix the speakers, the speaker stands must be fixed to the wall:
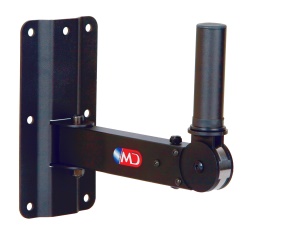
To mount the speaker stand follow the following steps:
- Place the stand on the wall and mark with a pencil the fixing points of the screws.
- Make the holes with a drill (minimum holes are recommended 6mm)
- Fix the brackets to the wall using the screws and the fixing plugs.
- Use the Allen key attached to the product to adjust the inclination of the support. Check that the tilt is tight after adjusting it.
- Mount the speaker directly on the stand.
- Connect the speaker cable from the back. To connect the connector, insert it and turn it until it clicks.
- To remove the connector, pull the silver tab and turn the connector.
Startup
Before starting
- Connect the USB cables directly to the USB ports of the computer. Avoid using intermediate elements to connect them.
- Make sure that the switches you connect are not associated with any voltage source.
- Do not install the equipment inside metal cabinets, as they may reduce the coverage of radio frequency signals.
- When using the infrared signal emission to control equipment, make sure that there is direct visibility between the SHX Central Device and the equipment to be controlled.
Lighting Devices
The SHX System allows the control of different lighting elements.
This allows to change the colors and to regulate the intensity of the lighting depending on the activity and according to the ambient sound or the projected images.
a) Connections:
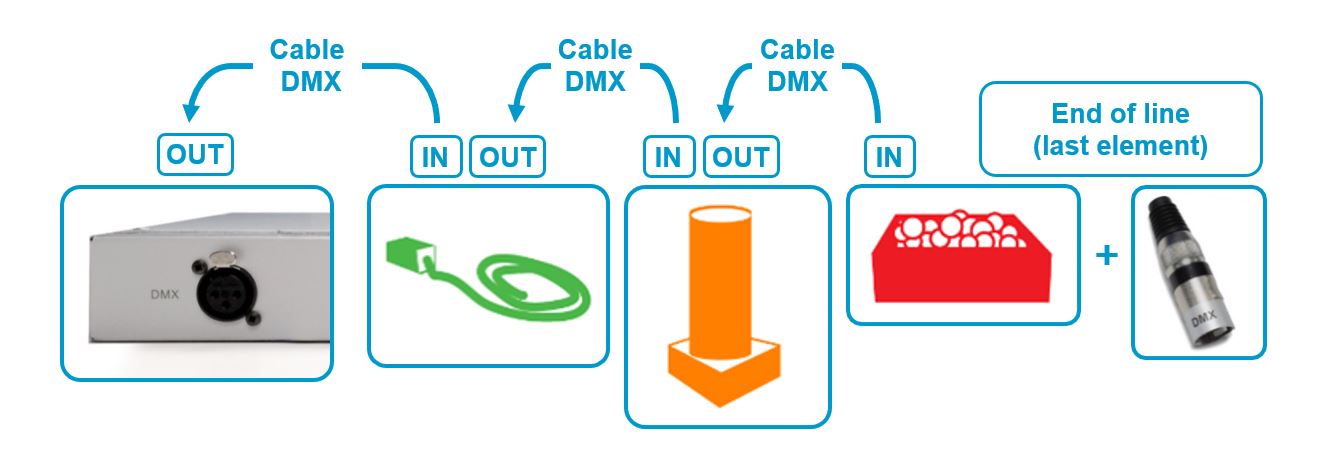
The control of the lighting elements is done through DMX connections. The lighting elements must be compatible with DMX protocol.
Connect DMX cable from the SHX Device to the first DMX element of the chain and also, on the last element, connect the end of line connector.
b) Functioning:
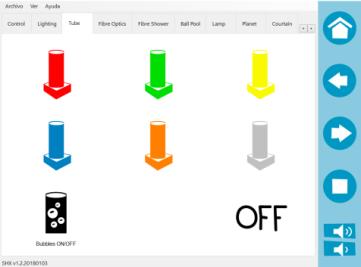
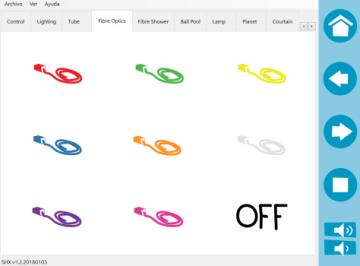
The color of the different elements installed in the room is controlled on each tab.

Effects control
This device can control wirelessly effect elements such as fan, Stars, Bubbles, UV lights among others.
a) Connections:
IMPORTANT: Mount the antennas and make sure they are not close to sources which could produce interferences.
All effect elements must be connected to the power through the Enabler Socket + receiver (BJ-234).
b) Functioning:
The elements are controlled from the icons on the “Control” tab.

Access by wireless controls
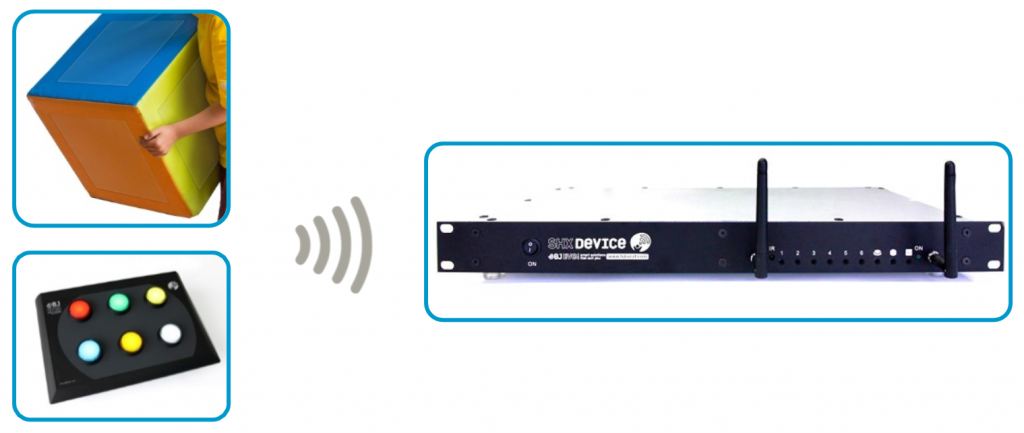
This unit can receive orders from different controllers in the room to activate wirelessly the contents configured on the SHX software. For example: SHX Dice, SHX Controller, SHX Mat or the SHX Switch.
a) Connections:
IMPORTANT: Mount the antennas and make sure they are not close to sources which could produce interferences.
b) Functioning:
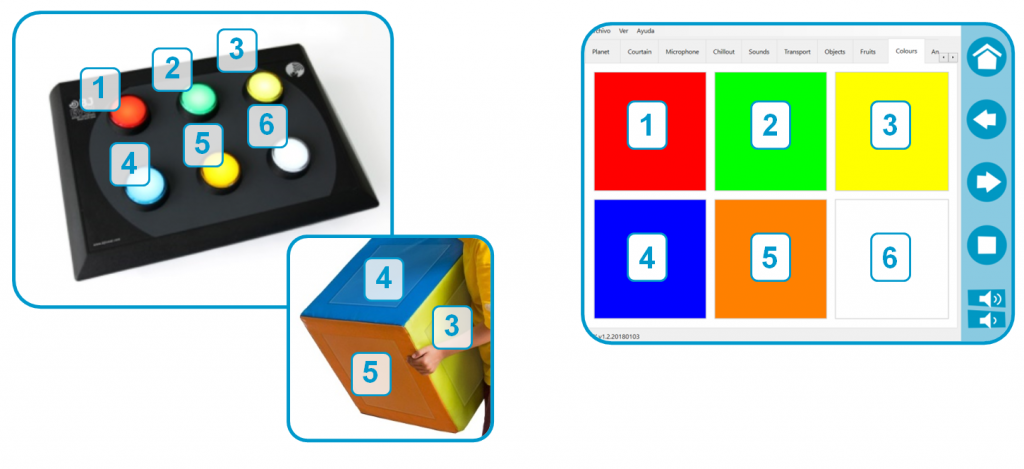
From the wireless elements, the software boxes can be activated. Each button activates a box of the selected tab.
Access by switches
It’s possible to activate contents of the SHX software using switches.
a) Connections
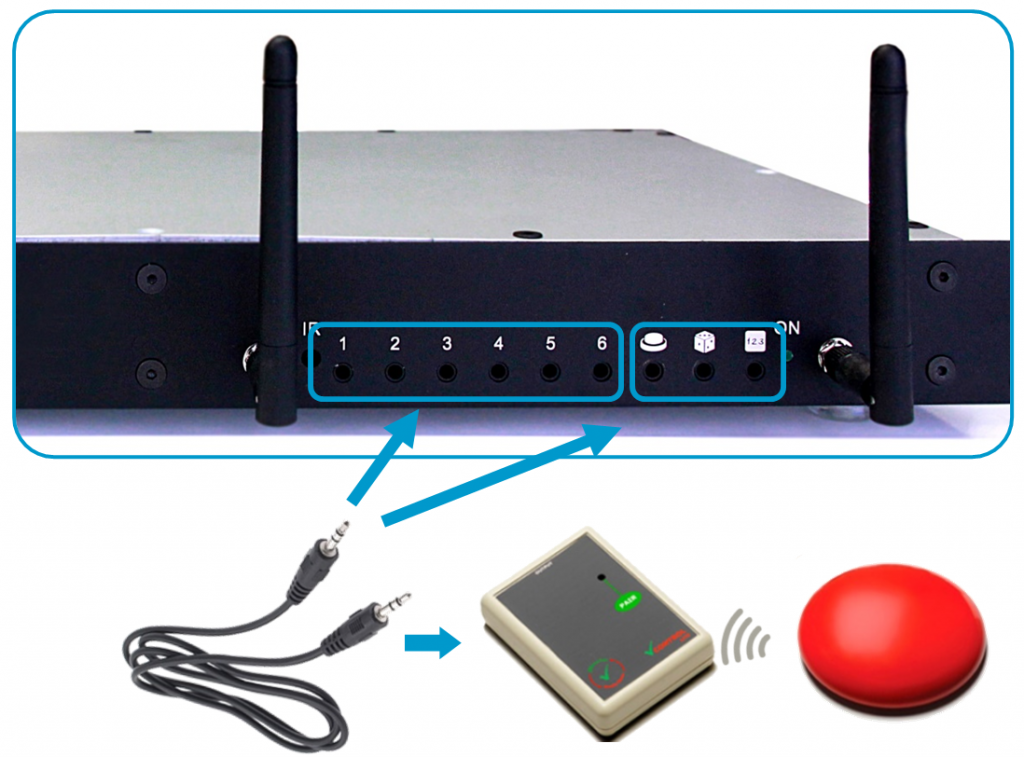
Connect a switch (wireless switches recommended) to the control inputs and choose the desired function.
b) Functioning:
There are 6 direct inputs that activate the first 6 cells of each tab.
Direct entries:

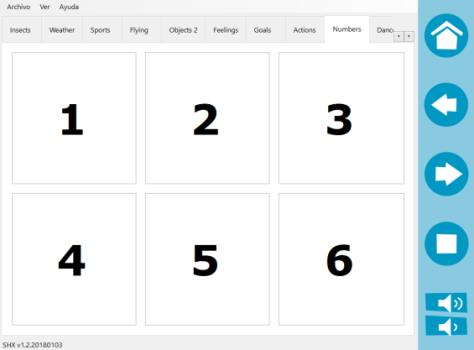
Special functions inputs

Sweep: when activating this entry, the scanning of the cells from the selected tab starts. A second activation will iniciate the content of the selected cell.

Random: with each pressing, a cell of the active tab is activated randomly.

Sequential: with each activation in this input, all cells of the tab activate by order.
Control of elements by infrared
From this device, it’s possible to control elements of the environment that already have remote controls, for example: Projector, TV … Using the SHX software you can store buttons of other remote controls to activate these elements from the SHX software.
a) Connections:

b) Functioning
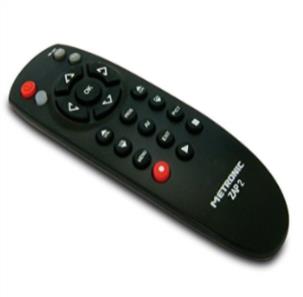
The SHX software allows memorizing the “IR function” of any command, facing the command towards the IR REC identifier.
Consult the SHX manual to integrate this function into a tab or scene.
Activating the programmed box will turn ON the device that until now controlled the infrared command.

Software configuration
Enclosed with the SHX Rack is an SHX Uer Guide to program the SHX software and customize the room’s operation.
In addition, you can consult the SHX Content Library to download multiple activities and collections.
Maintenance
- Before cleaning, disconnect the equipment from the wall plug.
- Clean using soapy water and a soft cloth (wrung out).
- Never use chemical or abrasive products for cleaning.
- Thoroughly dry the product and do not feed until it is completely dry.
- Check that the ventilation openings are free of dust to ensure proper ventilation of the device.
- It is recommended a periodic inspection of the devices, in case of detecting any anomaly disconnect the device from the current and immediately contact your supplier for assistance.
Troubleshooting
The following message appears in the SHX software:
‘Please connect the Central Device and restart the application’
This message appears when the computer does not detect the device. Check the following steps (section 2 of this manual):
- Check if the feeder is connected and that the plug has power. The feeder LED must be on.
- Check the connection of the power supply.
- Make sure the switch is ON position I.
- The power LED should on blue.
- Check the USB connection: tighten the USB connectors on both the device and the PC
- Close the application and reopen it.
Sound issues:
In case the speakers do not reproduce any sound, check the following points:
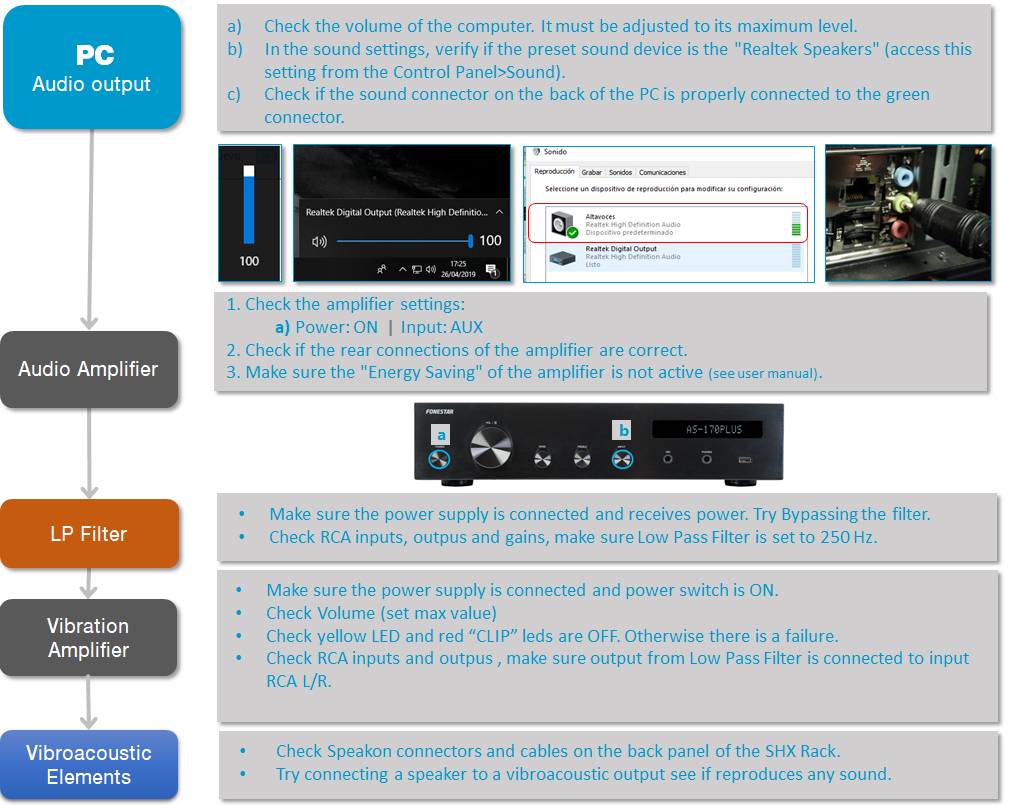
Also check the following section of the amplifier manufacturer’s guide to solve issues related to the amplifier:
Cannot feel any vibration:
In case the shakers do not reproduce any sound, check the following points:

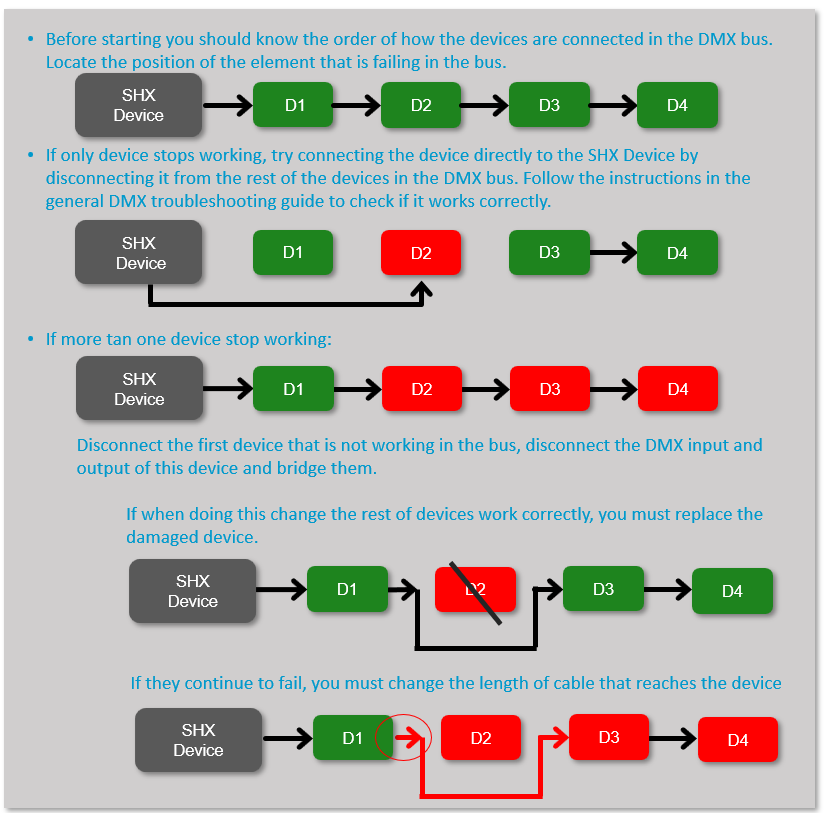
The lighting elements do not respond:
To verify the operation, it is better to connect a single lighting element directly to this device.
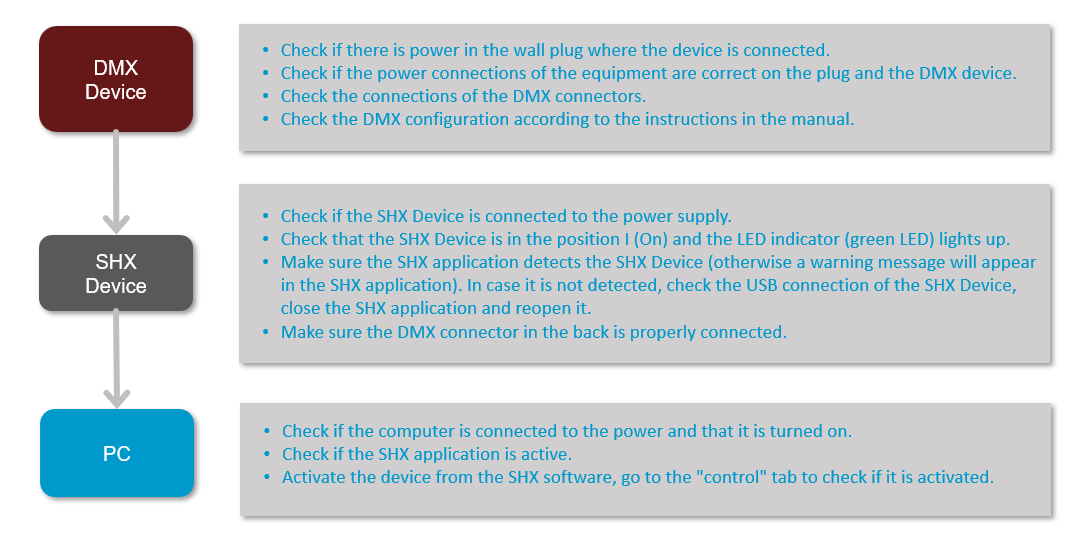
If the element that has been tested in the previous sections works correctly, add the rest of the elements of the installation one by one and:
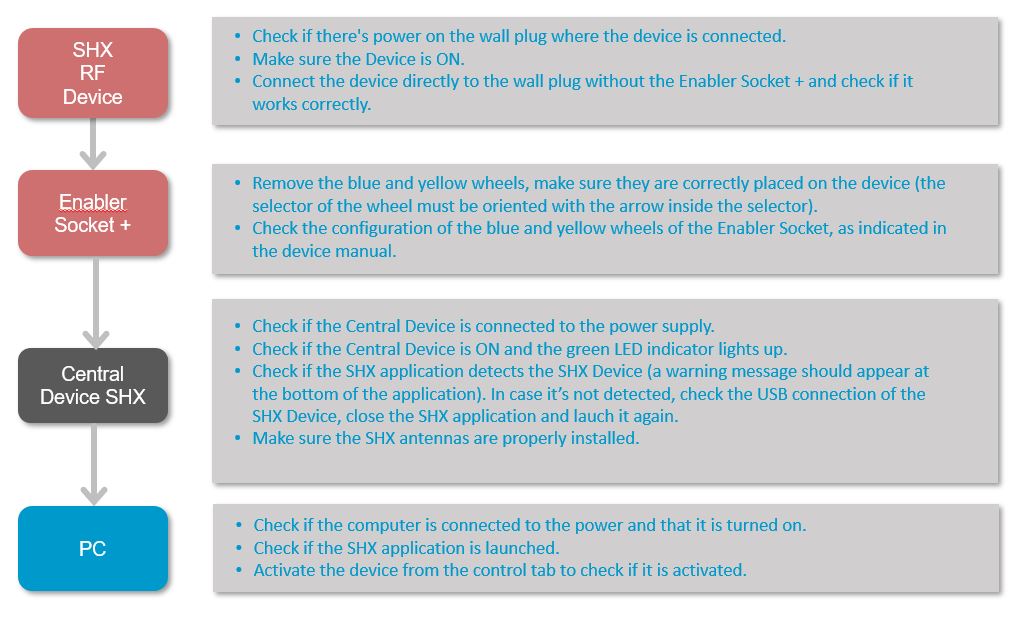
The radio frequency receivers of the SHX Effects (BJ-234 Enabler Socket +) do not respond:
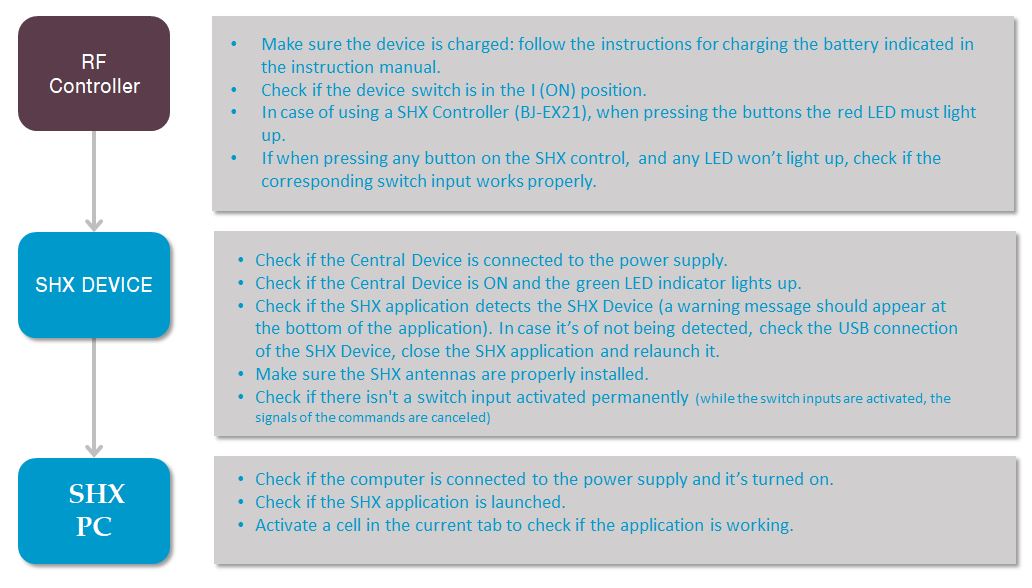
The device does not respond to wireless controls:
If the system doesn’t respond, follow the next guide.
To make sure the issue is not related to the current scene, test it in different scenes:
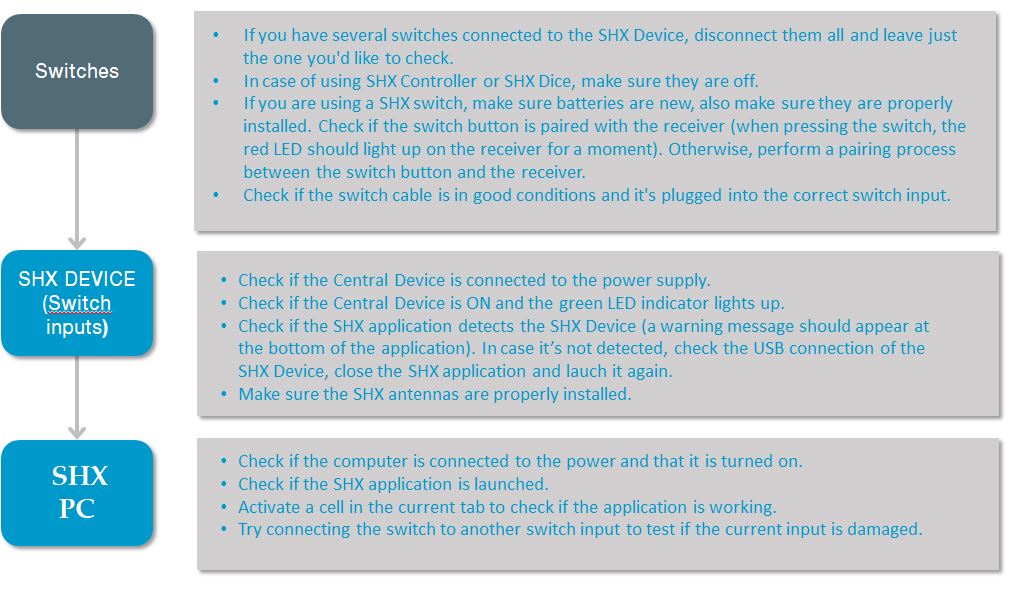
Switch inputs do not respond:
If the system doesn’t respond, follow the next guide.
To make sure the issue is not related to the current scene, test it in different scenes:
The elements controlled by infrared do not respond.
- Check connections according to sections 3 and 9
- Repeat the recording process several times in case there has been a recording failure.
- Make sure the receiver is switched ON.
- Make sure there is direct visibility between the IR emitter and the receiver.
- Try placing the IR emitter closer to the receiver.
Recycling
Electrical products should not be disposed of with household waste
- Dispose of the product at an electronic waste collection point or your specialist distributor.
- Place the packaging material in the cardboard, paper and plastic recycling bins.
- To avoid possible damage to the environment or human health that represents the elimination of this kind of waste, separate these products from other types of waste and reciprocally correct. In this way, the sustainable reuse of material resources will be promoted.
- Private users can contact the establishment where they purchased the product or the relevant local authorities to find out how and where they can take it to an ecological and safe recycling.
Warranty
Within the legal warranty period we agree to rectify for free by repairing or replacing defects in the product derived from defective materials or manufacturing defects.
Any unauthorised alteration or modifications to the product will void this warranty.
Product conformity
This product complies with the requirements indicated in the European Directive 2004/108 / EC.
Customer service
If you find any damage or any material is missing please contact our technical service for assistance.
Qinera
c/ Pacífic 51
08027 Barcelona, Spain
Phone: +34 93 285 04 37
Fax: +34 93 553 56 34
e-Mail: info@qinera.com
web: http://www.qinera.com
Any damage or breakage caused during transport must be notified within three days of receipt.


