
Introduction
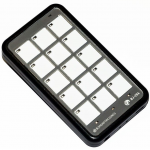
The BJ-256 is a remote control that allows controlling several devices in your environment in a simple way. It can be accessed directly using the keypad or by means of an external switch using the scanning method. Its customisation options make the device fully adaptable to your needs.
With this device it is possible to control:
- All BJ System Enablers which allow controlling common elements around the home, such as lights, blinds, alarms, doors, beds, windows… using RF protocol.
- All devices around the home operated by infrared remote controls, including stereos, televisions, DVD players, etc.
Description of the equipment
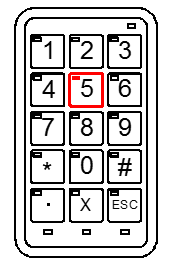
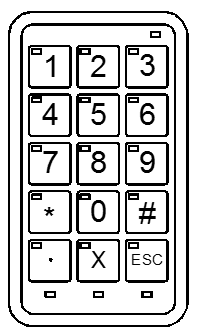
This controller has 15 cells, each fitted with its own high-brightness LED. It also has one LED in the top right-hand corner that indicates the battery status (battery LED) and three more LEDs along the bottom that indicate the level (level LEDs). All these cells except for the one used to change levels can be used to control your devices. There are 8 different levels (a set of programmable cells on the remote), so this remote control can be programmed with up to 112 different functions.
Parts of the equipment:
- Infrared window
- LED battery status
- Cell LED
- Methacrylate cover
- Level LEDs
- Control input (switch connection)
- Micro USB port for battery recharging
- Reset button
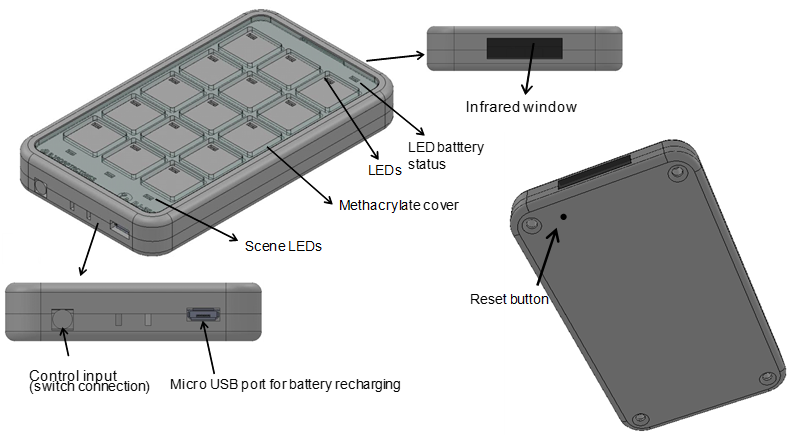
Figure 1. 3D view of BJ-256 remote control with top and bottom edges.
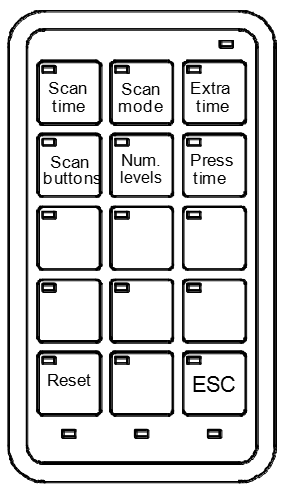
Icons, images or text can be added to the cells to indicate the element that they control. Each cell can contain icons, images or text for up to 4 functions (4 levels) as shown in the figure below. The template is designed using the software included with the remote.
This software can be also downloaded from the product’s webpage Control Pro Designer

Figure 2. Cells on the BJ-256 remote control.
The template needs to be printed on see-through paper so that the light from the LEDs can be seen through it.
The remote control includes a methacrylate cover and an ergonomic keypad with configurable tremor-control. It is equipped with a control input for connecting a switch next to the micro USB port, and an infrared port for recording and reproduction located on the top end of the remote. It is powered by a long-life battery that can be recharged by connecting it directly to the USB port of a computer or using the charger supplied with the remote. The reset button of the remote control is located on the back of it. It can be reset any time it fails to respond properly and all your settings will be saved.
To remove the methacrylate cover, press gently with your fingers between keys 2 and 14 using a pinching movement in order to bend the cover. Once the cover is in a curved position, you can remove it by lifting one of the sides and releasing the tabs.
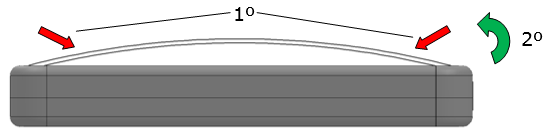
Figure 3. Removing the cover.
To reattach the cover, first insert one of the tabs in the position shown in Figure 4. Then flex the cover slightly and insert the tab on the opposite side.
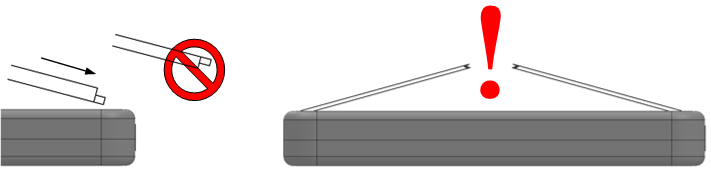
Figure 4. Attaching the cover.
IMPORTANT: DO NOT use too much force to bend the cover as it could break down.
Basic operation
The remote control can be operated directly by pressing the keys on its keypad (“direct control”) or by using a switch and the scanning selection option (“sequential control”).
Enabling a cell for direct control
The steps for enabling a key with the “direct control” functionality are as follows:
- Check that the battery is charged. To do this, check that the LED indicating the battery status (see Figure 2) is not flashing. If the battery status LED is flashing red, you need to charge the battery by connecting the charger supplied with the remote control to a USB port on a computer. When the battery LED turns green, this means that the battery is charged and you can continue to step 2 after you have disconnected the charger.
- Follow the instructions in section 3 of this manual to programme the key on the remote that you want to use (e.g. key 5).
- Prepare the device that you wish to control according to its instructions.
- Enable the programmed key (e.g. key 5) directly by pressing it. When you press down on the key, its LED will turn red and it will perform the programmed action.
The remote uses radio frequency signals to control BJ System receivers, so you can activate the receiver without the need for a direct line of sight between the remote and the receiver.
Infrared signals are used to control devices operated by remote controls that have been copied to the Control Pro. In this case, there must be a direct line of sight between the remote control and the receiver, just as there would with the original remote control.
Enabling a cell for scanning control
This section explains how to enable a cell on the remote for use with the “scanning” feature. Although the way that cells are used can be configured to suit the needs of the user, the scanning control feature comes with a default configuration that can be used to enable a cell as detailed below.
- Check that the battery is charged. To do this, check that the LED indicating the battery status (see Figure 2) is not flashing. If the battery status LED is flashing red, you need to charge the battery by connecting the charger supplied with the remote control to a USB port on a computer. When the battery LED turns green, this means that the battery is charged and you can continue to step 2 after you have disconnected the charger.
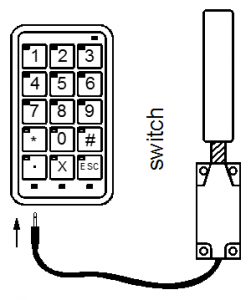
Connect the switch to the “control input” on the remote control.
Press the switch once to begin scanning. While scanning is in progress, the level LED will turn yellow. When the LED of the cell you want to enable lights up, press the switch again to select it. If this cell is already programmed, as explained in section 3, the programmed action will be carried out. Once you have finished, if you want to start again, press the switch again. 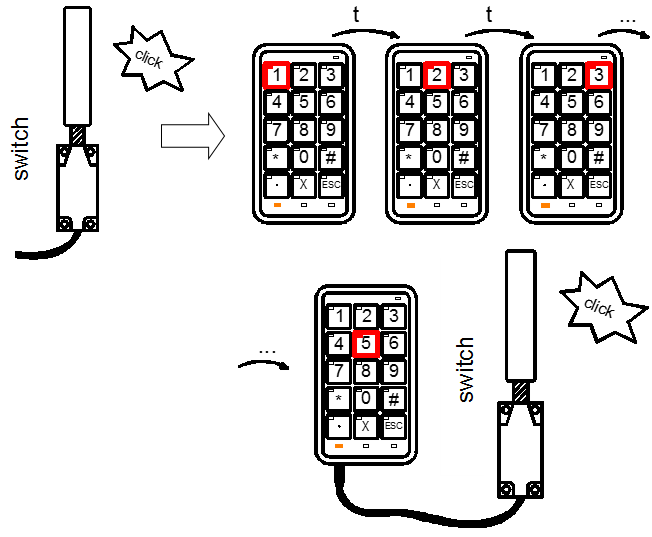
How a key is selected and the speed of scanning are parameters that can be configured to suit user requirements. In this configuration, the user can use the switch to access each of the cells on the remote and enable them.
NOTE: Sometimes, when the switch is connected, the LEDs of the different keys may automatically turn red in sequence. This indication of the enabled status of the different cells is known as scanning.
Changing levels
A level is a set of programmable cells on the remote. To increase the number of devices controlled, you can change the level on the remote. When the remote changes level, the functions programmed in the cells are stored but are no longer active. This way, you can programme the 14 cells again to control 14 new devices.
For example, you can programme cell 3 to set off an alarm in level 1 and to turn on the television in level 2.
The remote has eight levels and up to 112 programmable functions (14 cells in each level).
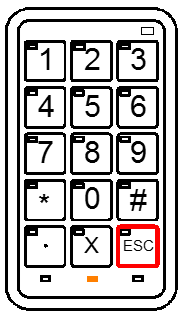
To change the level, activate the key that was programmed to change levels. By default, this is the last key (key 15), which is represented on the programming template with the symbol “S” or “ESC”. You can also change levels using any other key in which the code 300 has been recorded.
The number of levels set by default is 4. Follow instructions of section 7 to increase the number of levels.
The current level of the remote is indicated by the level LEDs:
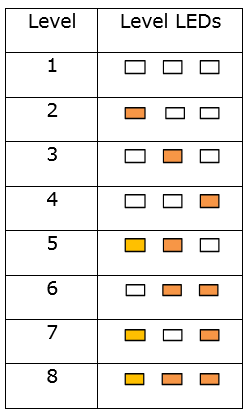
Any time you wish to change levels, you will need to activate the level change key and cycle through the levels. After level 8, you will be taken back to level 1.
Until this key is activated, the remote will remain permanently in the selected level.
Once a level has been selected, the programming and operation of the remote are as described in sections 1 and 3 of this manual.
NOTE: If code 300 was recorded in one of the 15 programmable keys, that key can also be used to change levels.
Programming
To get the most out of your remote, you need to programme each key with the desired functions. For example, key 1 could be programmed to set off an alarm, and keys 2 and 3 to turn the volume on the television up and down.
How they are programmed depends on the type of device you wish to control, i.e. whether it is a BJ System receiver or a device that works with infrared (devices that already have a remote control, like televisions, DVD players, stereos, etc.).
The keys are programmed in the same way regardless of how they are activated, i.e. regardless of whether you operate the control by direct touch or by scanning.
Programming for BJ radio frequency receivers
To control BJ System receivers, you must assign the RF code identifying the receiver to the key on the remote that will be used to operate this receiver.
ADDITIONAL INFORMATION:
What is an RF code?
For a remote to control the various receivers you have installed, each receiver must be identified by a code that differentiates it from the others. Hence, each receiver has an “RF code selector” that allows you to assign a code to it. By programming this code in the BJ System remote, you can control each of the receivers you have installed. See the user manual of the receiver you wish to control to find out its RF code.
Una vez se tenga la información del código a programar, se deben seguir los siguientes pasos:
- Escoger la escena deseada
- Seleccionar el modo de programación en el mando
- Escoger la tecla que se desea programar
- Grabar el código a programar
Once you have the information on the code to programme, follow these steps:
- Choose the level you require.
- Select the programming mode on the remote.
- Choose the key you wish to programme.
- Save the code to programme.
IMPORTANT: The RF code programmed into the remote must always be a three-digit number, so if the code indicated for the receiver only has 2 digits, add a 0 in front. For example, if you have a receiver for a socket with the code 37, programme the remote with the code 037.
It is a good idea to use the programming template when programming as it indicates the numbers and functions associated with each key.
Programming template.
In the following example, we will programme key 2 in level 1 to control an alarm receiver with an “RF code” of 25. The programming steps are as follows:
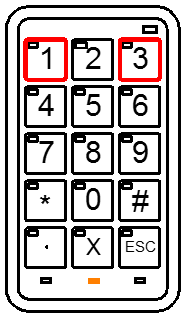
- Select the programming mode on the remote. Simultaneously activate the keys numbered 1 and 3 on the programming template. The battery LED will turn green.
- Choose the level you require. It is possible to select up to 8 levels. The level LED indicates which level we are currently in. By default, the remote selects level 1 (no level LED is lit up). To change levels, simply press the cell on the remote that you assigned level changing to.
- Choose the key you wish to programme. In this step, you need to choose which key on the remote you want to assign receiver control to. In the example here, this is the number 2 key. All keys can be programmed with functions except for the one used to change levels, which is typically key number 15 (represented by the symbol “S” or “ESC”), but it can also be any other key that has been programmed to change the level.
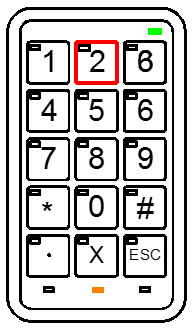
- Record the receiver code. In this step, the digits of the receiver code are entered one by one. In the example given (code 025), we must first press the 0 key, followed by the 2 key, and then the 5 key. The LED of each key will turn red for a second when it is activated. Then, if programming was successful, the remote returns to the standby position, except for the LED indicating the selected level which, if levels 2 or 3 are selected, will turn yellow.

IMPORTANT: You can exit programming by activating the last key (“S” or “ESC” key) again at any time during the process.
NOTE: Code 255 cancels all functions assigned to a key.
Programming for infrared receivers
Prepare the remote you want to duplicate. Make sure that there are no other infrared devices switched on in the room (some laptops, mobile telephones and other devices could interfere with the recording process).
When duplicating a remote control for a device, you need to remember that each key on the remote can only be programmed with a single function of the remote control of the device. For example, if you wish to control the volume of a stereo system, you need to record the “volume up” function on one key (e.g. key 2) and the “volume down” function on another (e.g. key 3).
To programme an infrared function, follow steps 1, 2 and 3 of the previous section for RF code recording, and then:
- Choose the level you require
- Select the programming mode on the remote
- Choose the key you wish to programme
- Enter the code 000. In this step, enter the code 000 by pressing the 0 key on the remote three times in a row. After 1 second, the battery LED will turn red, indicating that the remote is ready to record the infrared signal.
- Record the infrared signal on the Control Pro
a) Point the remote control that you wish to duplicate at the “infrared recording” port (see Figure 2) of the Control Pro and press the button on the remote that you wish to duplicate.
b) When the Control Pro has stored the function of the other remote, the battery LED will switch itself off, indicating that programming has ended.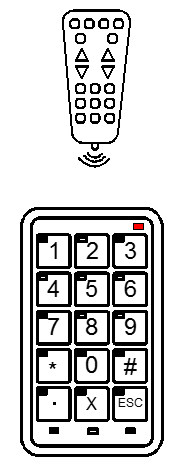
Code 400: When this code is used to record infrared signals instead of code 000, the device will perform the programmed action for as long as the key is pressed.
For example, if the action recorded is “turn up the volume on the television,” if code 000 was used, when you press the button where the signal was recorded, the volume on the television will be turned up one level. However, if you used code 400, the remote continues the action, so the volume will continue to rise until you release the button.
Code 500: This code is used for the dual recording of the infrared signal. This is a useful feature because the infrared signal emitted by some consumer devices can change even when the same button is pressed (e.g. the same button switches the television “on” and “off”). With this code, you can record the different signals emitted by the device to resolve situations where the recorded action would otherwise only work half of the time.
To begin, record the first press of the button on the remote control you wish to copy using code 000 and then record the second time it is pressed using code 500. Check that they were recorded correctly; if not, repeat the process until they are recorded correctly. If after five attempts you have not managed it, contact your dealer as it may be possible that the two remotes are incompatible.
Macro programming with sequences of up to 7 consecutive actions
A macro is a series of actions performed sequentially in a set space of time. For example: open the door to the building, turn on the hall light and call the lift. To programme macros, follow steps 1, 2 and 3 for RF code recording. The next steps to follow are explained below:
- Choose the level you require
- Select the programming mode on the remote
- Choose the key you wish to programme
- Enter code 700. In this step, you need to enter code 700. The battery LED will turn green and the three level LEDs will light up.
- Enter each code of the sequence.
a) If you enter RF codes, remember that you must enter each one as a 3-digit code. The level LEDs will flash after each code is entered.
b) b) To enter IR codes, follow the instructions in section 3.3: Choose the level you require – Select the programming mode on the remote – Choose the key you wish to program – Enter the code 000 – record the IR signal by facing the original remote and the Control Pro IR port.
NOTE: Up to 9 codes can be entered in each key, including a maximum of 5 IR codes.
- End the sequence.To end the sequence, enter code 700. The battery LED and three level LEDs will switch themselves off and the remote will return to standby mode.
To record a macro with numbers, for example “channel 17” in one cell: 1) Choose the level you require. 2) Select the programming mode on the remote. 3) Choose the key you wish to program. 4) Enter code 700. 5) Press 000, then first number in the macro (1) Then 000 again and second number (7). Finish entering code 700.
IMPORTANT: Remember that you can only enter 9 codes for each key, including a maximum of 5 IR codes.
NOTE: When the sequence is activated, there will be a 1-second time lag between the actions.
Direct programming of a complete telephone control level
If you wish to control a BJ telephone, you can programme the remote directly with all the keys and memories stored in the telephone. For this type of programming, follow steps 1, 2 and 3 for RF code recording. To make programming simpler, you should follow the steps below according to your specific case:
a) To record all keys and memories stored on the BJ telephone, enter code 600. This code affects the entire level. By entering code 600, each cell on the remote control in the selected level will be programmed with the following RF codes:
- Codes 90-99= memories stored in the BJ telephone
- Code 110 = pick up and hang up
- Codes 100-112 = numerical keys on the BJ telephone
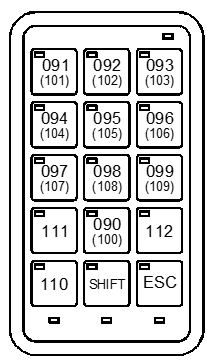
If you press the key with the code 91, the telephone dials the number stored in memory 1. When you press the [SHIFT] key, the next time a key is pressed, the value in brackets will be sent, i.e. if you now press the same key as above, number 1 will be dialled. The [SHIFT] key does not affect the other functions of the remote and is not disabled if a key without a dual value is pressed.
b) To record memories only, enter code 601. This code affects the entire level. When you enter the code 601, each cell on the remote in the selected level will be programmed with the following RF codes:
- Codes 90-99= memories stored in the BJ telephone
- Code 110 = pick up and hang up
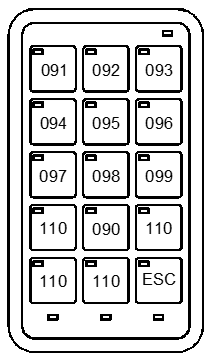
If you press the key with the code 91, the telephone dials the number stored in memory 1, and so on.
c) To record telephone keys only, enter the code 602. This code affects the entire level. When you enter the code 602, each cell on the remote in the selected level will be programmed with the following RF codes:
- Codes 100-112 = numerical keys on the BJ telephone
- Code 110 = pick up and hang up
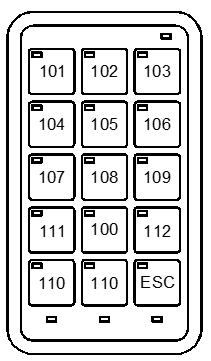
If you press the key with code 101, number 1 on the BJ telephone will be dialled, and so on.
Remote control configuration
We recommend configuring the remote to suit your needs when you use it in “sequential control” mode. Configuring the remote correctly will ensure more efficient and convenient access and control. This section describes the various parameters that can be configured. Section 7 of this manual describes how you can modify any of these parameters.
The parameters that can be configured are:
- Scan time
Indicates the time elapsed between one cell lighting up and the next, or between one row and the next. Values from 0.1 to 9.9 seconds can be entered. The values must be entered in the format “x.y” [seconds][.] [tenths of a second].
- Scan mode
You can choose between the two types of scan described in the previous section: cell-to-cell scanning and scanning by rows and columns. The codes to enter are 000 (simple scanning) or 001 (scanning by rows/columns).
- First scan option extra time
Extra time needed for the user to activate the switch a second time in order to activate the first cell. Values from 0.1 to 9.9 seconds can be entered. The values must be entered in the format “x.y” [seconds][.] [tenths of a second].
- Accidental press time
Refers to the time after the switch is pressed during which the remote ignores subsequent presses. For example, if a time is set of 0.5 seconds after the switch is pressed, the remote will ignore further presses until this time has elapsed.
Increase this value if the switch may be unintentionally activated repeatedly just after it has been intentionally activated.
The values must be entered in the format “x.y” [seconds][.] [tenths of a second].
- Levels
This determines the maximum number of levels you wish to have available on the remote both for scanning and for use as a direct control, up to a maximum of eight. Codes 001, 002, 003, 004, 005 and so on should be entered.
- Scan buttons
Indicates the number of active cells on which you wish to scan. To indicate the number of cells, enter a number from 001 to 015. If less than 15 buttons are configured and a change of level is required, one button needs to be programmed to change levels. The number of scan buttons configured will be the same in every level.
- Restore factory default settings
This option sets the value of all parameters to their factory defaults. Code 000 should be entered to reset the remote. If any other value is entered, the remote will do nothing. The number of levels set by default is 4 and the number of cells 15, including the key for changing levels.
IMPORTANT: All key programming is lost when the factory default settings are restored.
To configure any of these parameters, follow the process outlined below.
The figure below shows the template required for configuration. It shows the relationship between each of the cells and the parameter to be set.
NOTE: To help clarify the explanation, the following description includes an example of the configuration of a scan time, with the value set to 2 seconds.
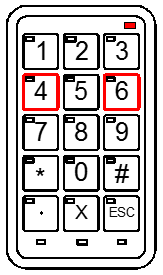
- Enable the configuration mode on the remote. To enter the remote configuration mode, press keys 4 and 6 simultaneously. The battery LED will turn red, indicating that the remote is ready to be configured.
- Select the parameter to set. Activate the cell for the parameter you wish to set, following the instructions in the configuration template (Figure 3).
In the example shown, if we wish to change the scan time we will need to press the 1 key.
The battery LED will turn green, indicating that the remote is waiting for the value of the parameter.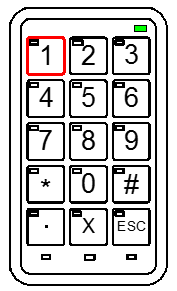
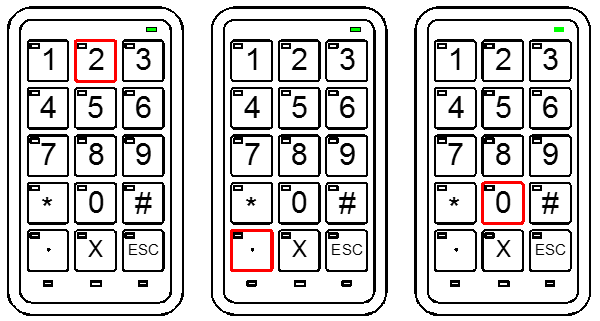
- Select the parameter value.In this step, we must enter the value of the parameter in the format indicated in section 6. In our example, to enter a scan time of 2 seconds, we must press the “2” key followed by the “.” key and then the “0” key, using the format “x.y”. Once the process is complete, the start-up sequence will run, i.e. all the LEDs on the remote will light up for an instant to confirm the reading of the new value.
Backup
Once the Control Pro is programmed and configured, it is posible to save a backup coppy. This will allow you to restore the configuration at any moment if needed.
The backup includes both RF and recorded IR programmed codes as well as the remote settings: number of scenes, scan duration, etc…
Requirements:
In order to be able to back up the Control PRO it is necessary to have version 2 (V2) or later.
The product version is identified on the back label of the device: (e.g. -256v2.0001)
Download:
You can download the backup software from the following link:
This program is only available for Windows.
How to install:
When downloading from the link in the previous section, a file named ControlProBackupSetup.msi will be downloaded. Check the download folder to locate the file.
Double-click on the file and follow the installation steps.
You may encounter a Windows security warning message when you try to run it. The program is completely safe and can be installed without any problems.
Once installed, you can access the program normally in the Windows program list by searching for the program: Control Pro Backup
Make a backup copy:
IMPORTANT: Before opening the program you must connect the Contro PRO controller to the USB port of the computer using the charging cable.
- Run the application with the controller connected to the USB port.
Set the Control Pro in “Backup mode”: press 7 an 9 buttons simultaneously. The battery LED must be orange (red and green connected).

3. Select Backup Backup in the program and select the name and location of the file (it will be saved with extension .bj256).
4. Press any button on the Control PRO to to exit programming mode.
How to recover a backup copy::
- Run the application with the Control Pro connected to the USB port.
Set the Control Pro in “Backup mode”: press 7 an 9 buttons simultaneously. The battery LED must be orange (red and green connected).
- Press Restore in the program and select the name and location of the file.
- Press any button on the control unit to exit programming mode.