
Introduction
The SHX Controller allows you launch 6 different scenes from the selected SHX activity. Each button of the controller corresponds to a button of the selected activity in the SHX program.
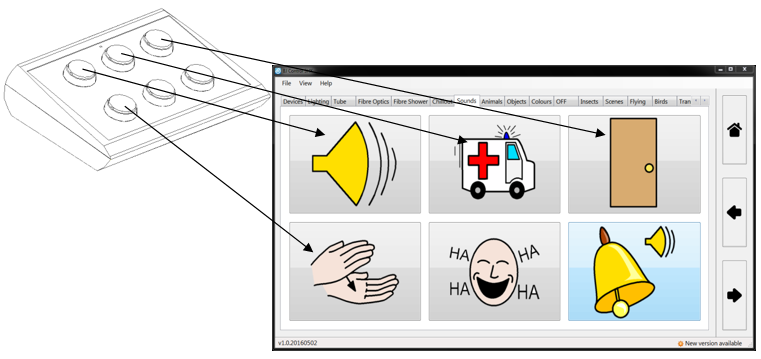
When the activity is changed, the scenes (buttons) will change and the controller will launch different contents accordingly.
Parts of the equipment
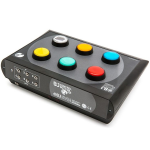
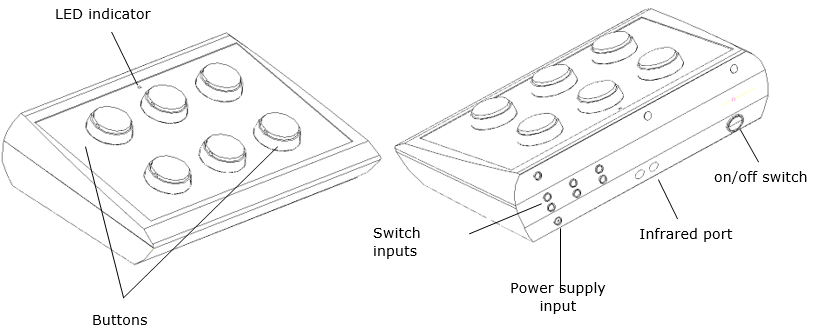
This remote has an ergonomic keypad with six buttons, 6 switch inputs, an infrared port, LED status indicator, on/off switch and input for battery charging. It is powered by a battery that can be recharged by connecting it directly to the USB port of a computer or to the mains using the charger supplied with the remote control.
It allows programming up to ten different functions: two functions per each button, with the exception of the scene change button. If you do not want to use both scenes, you can program functions on the six buttons of the remote.
When using the remote to control elements of a Sensory room, the six buttons will correspond with the 6 first buttons programmed in a scene of the SHX Software.
Changing the covers of the buttons
It is possible to change the covers and the labels of the buttons. This allows choosing among different covers (transparent or colour ones) and change the icons to label the buttons if desired.
Remove the covers by introducing any thin object in the covers’ slot and pull towards the buttons outside.

Fig. 1. Changing a button’s cover.
Basic operation
To facilitate the explanation of the operation of the device, we have associated a symbol to each button. See figure below (Fig. 2).
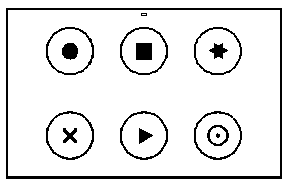
Fig. 2. Symbol associated to each button.
Follow these steps to use the device:
- Check that the remote is on and the battery is charged. The battery needs charging when the LED on the remote flashes red.
- Follow the instructions in section 3 of this manual to program the key that you want to use on the remote (e.g. key ⋆).
- Prepare the device that you wish to control according to its instructions.
- Enable the programmed key (e.g. key ⋆) directly by pressing it. When pressing the key, if you are in scene 1 the LED will turn red, whereas if you are in scene 2, the LED will turn green. The programmed action will then be performed. To enable a function that is programmed in scene 2 on the same key, press the changing scene key and then the key with the programmed function.
The programmed functions can be enabled by directly pressing the buttons or by means of switches.
The remote uses radio frequency signals to control BJ System devices, so you can activate the device with no need to aim the remote to the receiver.
Infrared signals are used to control devices operated by remote controls (e.g. TV, DVD players, etc). In this case, there must be a direct line of sight between the remote control and the receiver, just as there would be with the original remote control.
Programming
The way to program the remote depends on the type of equipment you wish to control, i.e. whether it is a BJ System receiver or a device that works with infrared (devices that already have a remote control, like televisions, DVD players, stereos, etc.).
Programming for BJ System receivers
To control BJ System receivers, you must assign the RF code identifying the receiver to the key on the remote that will be used to operate with this receiver.
ADDITIONAL INFORMATION:
What is an RF code?
For a remote to control the various receivers installed, each receiver must be identified by a code that differentiates it from the others. Each receiver has an “RF code selector” that allows you to assign a code to it. By programming this code in the BJ System remote, you can control each of the receivers installed. See the user manual of the receiver you wish to control to find out its RF code.
Once you have the information on the code to program, follow these steps:
- Choose the key you wish to program.
- Select the programming mode on the remote.
- Enter the code to program.
- Record in the desired scene.
IMPORTANT: The RF code programmed into the remote must be always a three-digit number, so if the code indicated for the receiver only has two digits, add a 0 in front. For example, if you have a receiver for a socket with the code 37, program the remote with the code 037.
It is a good idea to use the programming template when programming (fig. 3) as it indicates the numbers and functions associated with each key.
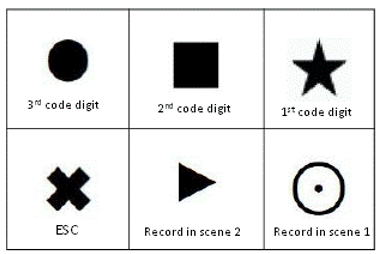
Fig. 3. Programming template.
In the following example, we will program the key ⋆ in scene 1 to control an alarm receiver with an “RF code” of 25. The programming steps are as follows:
- Choose the key you wish to program.In this step, you need to choose which key on the remote you want to assign receiver control to. In the example here, this is the ⋆ key.
All keys can be programmed with two functions except for the one used to change scenes (this can be the ▲ key or any other key that has been programmed to change the scene). - Select the programming mode on the remote. In this step, press and hold the key you wish to program. The status LED will turn red. Without releasing the button, use something pointed to press and release the reset button (on the back of the remote). The LED will turn green, indicating that the remote is ready for a function to be programmed in the selected key.
- Enter the code to program.In this step, the digits of the receiver code are entered one by one.
In the example given (code 025), these would be entered as follows:
- Press the ⋆ button 0 times
- Press the ■ button 2 times
- Press the ● button 5 times
- Record in the desired scene. After entering the code digits of the receiver, press the Record Scene 1 (⊙) button to save the code in scene 1. Alternatively, press the Record Scene 2 (▲) button to save the code in scene 2. After completing this action, the remote goes into standby mode.
IMPORTANT: If the remote freezes while programming or you wish to cancel it, you can exit programming by pressing the (×) key at any time during the process.
NOTE: Code 255 cancels all functions assigned to a key.
Programming for infrared functions (standard receivers)
Prepare the remote you want to duplicate. Make sure that there are no other infrared devices switched on in the room (some laptops, mobile telephones and other devices could interfere with the recording process).
When duplicating a remote control for a device, you need to remember that each key on the remote can only be programmed with a single function of the remote control of the device. For example, if you wish to control the volume of a stereo system, you need to record the “volume up” function on one key and the “volume down” function on another.
To program an infrared function, follow steps 1 and 2 of the previous section for RF code recording, and then:
- Prepare the remote to record the infrared signal. In this step, enter the code 000. To do this, press the Record Scene 1 or Record Scene 2 button directly, depending on which scene the function you wish to record is in. The LED will turn red, indicating that the remote is ready to record the infrared signal in the selected key.
- Record the infrared signal.
a) Point the remote control that you wish to duplicate at the “infrared recording” port of the sequential direct remote control and press the button on the remote that you wish to duplicate.
b) When the control has stored the function of the other remote, the LED will switch itself off, indicating that programming has ended.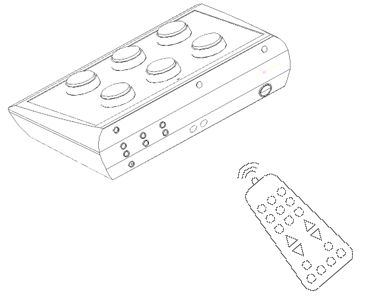
Summary of codes for programming and special codes
- 000. To record infrared signals from standard remotes.
- 300. To change from scene 1 to scene 2 and vice versa. It should be recorded in both scenes in order to be able to change to the desired scene.
- 400. To record infrared signals instead of code 000 when we want the device to perform the programmed action for as long as the key is pressed. For example, if the action recorded is “turn up the volume on the television,” if code 000 was used, when pressing the button where the signal was recorded, the volume on the television will turn up one level. However, if you used code 400, the remote continues the action, so the volume will continue to rise until you release the button.
- 500. This code is used for the dual recording of the infrared signal. This is a useful feature because the infrared signal emitted by some consumer devices can change even when the same button is pressed (e.g. the same button switches the television “on” and “off”). With this code, you can record the different signals emitted by the device to resolve situations where the recorded action would otherwise only work half of the time. To begin, record the first press of the button on the remote control you wish to copy using code 000 and then record the second time it is pressed using code 500.
- 800. To perform the action recorded in a key in scene 2 in the next press of the key. The battery LED flashes green to indicate the change of scene. After the second keystroke, the remote automatically returns to scene 1.
NOTE: Check that they were recorded correctly; if not, repeat the process until they are recorded correctly. If after five attempts you have not managed it, contact your dealer as it may be possible that the two remotes are incompatible.